• New Home
  • About
  • Contact
  • Tips & Tutorials
  • Portfolio
  • Digital Downloads
  • SHOP
  • featured in
  • INSTAGRAM
Menu

JoAnna Seiter

  • New Home
  • About
  • Contact
  • Tips & Tutorials
  • Portfolio
  • Digital Downloads
  • SHOP
  • featured in
  • INSTAGRAM
1-JoAnna-Seiter_Square.jpg

JoAnna’s Tips & Tutorials

Hi, I’m JoAnna, thanks for stopping by! I love creating textile and surface pattern designs, sewing, and painting. I’m always learning new things and want to share some of that info with you. I hope to bring you a helpful tutorial or a quick little tip each week.


Latest Posts:

Featured
Cameo 4 Foil Quill Alternative
Jun 7, 2022
Cameo 4 Foil Quill Alternative
Jun 7, 2022
Jun 7, 2022
Silhouette Cameo 4 Fine Tip Foil Quill Adapter
May 31, 2022
Silhouette Cameo 4 Fine Tip Foil Quill Adapter
May 31, 2022
May 31, 2022
Shrink Plastic Pins with the Cricut Maker
Mar 15, 2022
Shrink Plastic Pins with the Cricut Maker
Mar 15, 2022
Mar 15, 2022
Making Pins using Black Shrink Plastic and the Foil Quill
Mar 8, 2022
Making Pins using Black Shrink Plastic and the Foil Quill
Mar 8, 2022
Mar 8, 2022
Another Style of Watercolor Clipart in Procreate
Mar 1, 2022
Another Style of Watercolor Clipart in Procreate
Mar 1, 2022
Mar 1, 2022
Creating Watercolor Style Clip Art in Procreate to Use With Your Cricut or Silhouette Machine
Feb 22, 2022
Creating Watercolor Style Clip Art in Procreate to Use With Your Cricut or Silhouette Machine
Feb 22, 2022
Feb 22, 2022
Creating Gouache Style Clip Art in Procreate to Use With Your Cricut or Silhouette Machine
Feb 15, 2022
Creating Gouache Style Clip Art in Procreate to Use With Your Cricut or Silhouette Machine
Feb 15, 2022
Feb 15, 2022
Creating a Single Line SVG File in the Adobe Illustrator App Using Vectorize
Feb 8, 2022
Creating a Single Line SVG File in the Adobe Illustrator App Using Vectorize
Feb 8, 2022
Feb 8, 2022
Creating Your Own Single Line SVG File - Part Three
Feb 1, 2022
Creating Your Own Single Line SVG File - Part Three
Feb 1, 2022
Feb 1, 2022
Creating Your Own Single Line SVG Files - Part Two
Jan 25, 2022
Creating Your Own Single Line SVG Files - Part Two
Jan 25, 2022
Jan 25, 2022
Creating Your Own Single Line SVG Files - Part One
Jan 18, 2022
Creating Your Own Single Line SVG Files - Part One
Jan 18, 2022
Jan 18, 2022
Low Poly Heart Box
Jan 11, 2022
Low Poly Heart Box
Jan 11, 2022
Jan 11, 2022
Planner Stickers with the WRMK Foil Quill
Jan 4, 2022
Planner Stickers with the WRMK Foil Quill
Jan 4, 2022
Jan 4, 2022
3D Cardstock Snowflakes
Dec 28, 2021
3D Cardstock Snowflakes
Dec 28, 2021
Dec 28, 2021
Portrait 3 Print and Cut Gift Labels
Dec 21, 2021
Portrait 3 Print and Cut Gift Labels
Dec 21, 2021
Dec 21, 2021
DIY Gift Card Envelopes
Dec 14, 2021
DIY Gift Card Envelopes
Dec 14, 2021
Dec 14, 2021
Blade Replacement Alternatives for Portrait 3
Dec 7, 2021
Blade Replacement Alternatives for Portrait 3
Dec 7, 2021
Dec 7, 2021
12 Gift Ideas for Someone Who Owns a Cricut or Silhouette Machine
Nov 30, 2021
12 Gift Ideas for Someone Who Owns a Cricut or Silhouette Machine
Nov 30, 2021
Nov 30, 2021
Foiling on Acrylic with Cricut and WRMK Foil Quill
Nov 23, 2021
Foiling on Acrylic with Cricut and WRMK Foil Quill
Nov 23, 2021
Nov 23, 2021
How to Set Up Your Template on Your Cutting Mat for Silhouette Users
Nov 16, 2021
How to Set Up Your Template on Your Cutting Mat for Silhouette Users
Nov 16, 2021
Nov 16, 2021
Etching on Acrylic with the Silhouette Portrait 3
Nov 9, 2021
Etching on Acrylic with the Silhouette Portrait 3
Nov 9, 2021
Nov 9, 2021
Foil Quill on Acrylic with the Portrait 3
Nov 2, 2021
Foil Quill on Acrylic with the Portrait 3
Nov 2, 2021
Nov 2, 2021
Scoring with the Portrait 3 Using the Cricut Scoring Stylus
Oct 26, 2021
Scoring with the Portrait 3 Using the Cricut Scoring Stylus
Oct 26, 2021
Oct 26, 2021
Silhouette Portrait 3 Scoring with the Bevel Quill
Oct 19, 2021
Silhouette Portrait 3 Scoring with the Bevel Quill
Oct 19, 2021
Oct 19, 2021
Tips for Using the WRMK Fine Tip Foil Quill with the Silhouette Portrait 3
Oct 12, 2021
Tips for Using the WRMK Fine Tip Foil Quill with the Silhouette Portrait 3
Oct 12, 2021
Oct 12, 2021
Using the Trace Tool in Silhouette Studio
Oct 5, 2021
Using the Trace Tool in Silhouette Studio
Oct 5, 2021
Oct 5, 2021
Using the Silhouette Portrait 3 Pixscan Mat to Cut Stickers
Sep 28, 2021
Using the Silhouette Portrait 3 Pixscan Mat to Cut Stickers
Sep 28, 2021
Sep 28, 2021
Cricut Snap Mat Feature to Cut Stickers
Sep 21, 2021
Cricut Snap Mat Feature to Cut Stickers
Sep 21, 2021
Sep 21, 2021
Cutting Full Sticker Sheets with Your Cricut - Part 3 - Final Cutting
Sep 14, 2021
Cutting Full Sticker Sheets with Your Cricut - Part 3 - Final Cutting
Sep 14, 2021
Sep 14, 2021
Cutting Full Sticker Sheets with Your Cricut - Part 2 - Test Printing
Sep 7, 2021
Cutting Full Sticker Sheets with Your Cricut - Part 2 - Test Printing
Sep 7, 2021
Sep 7, 2021

Digital Downloads

Featured
Floral Easter Egg Single Line SVG Files
$2.00
Carnation Flower Single Line SVG File, Botanical Floral Clip Art, Instant Digital Download
$3.00
Daffodils_Main Page-01.jpg
Daffodil Flower Single Line SVG Files
$3.00
Lilies_Main Page-01.jpg
Lily Single Line SVG Files
$2.00
3D Low Poly Heart Box SVG File
$2.00
Month, Day, Numbers Single Line SVG files
$2.00
Celestial_Main Page-01.jpg
Celestial Theme Single Line SVG Files
$5.00
Good Luck Charm Single Line SVG Files
$5.00
Floral Skull Single Line SVG Files
$3.00
Snowflake Single Line SVG Clip Art Files
$5.00
Filled Letters Cricut Design Space vs Silhouette Studio

Cricut Design Space vs Silhouette Studio - Filled Letters

April 06, 2021 in Cricut, Silhouette, Tutorial

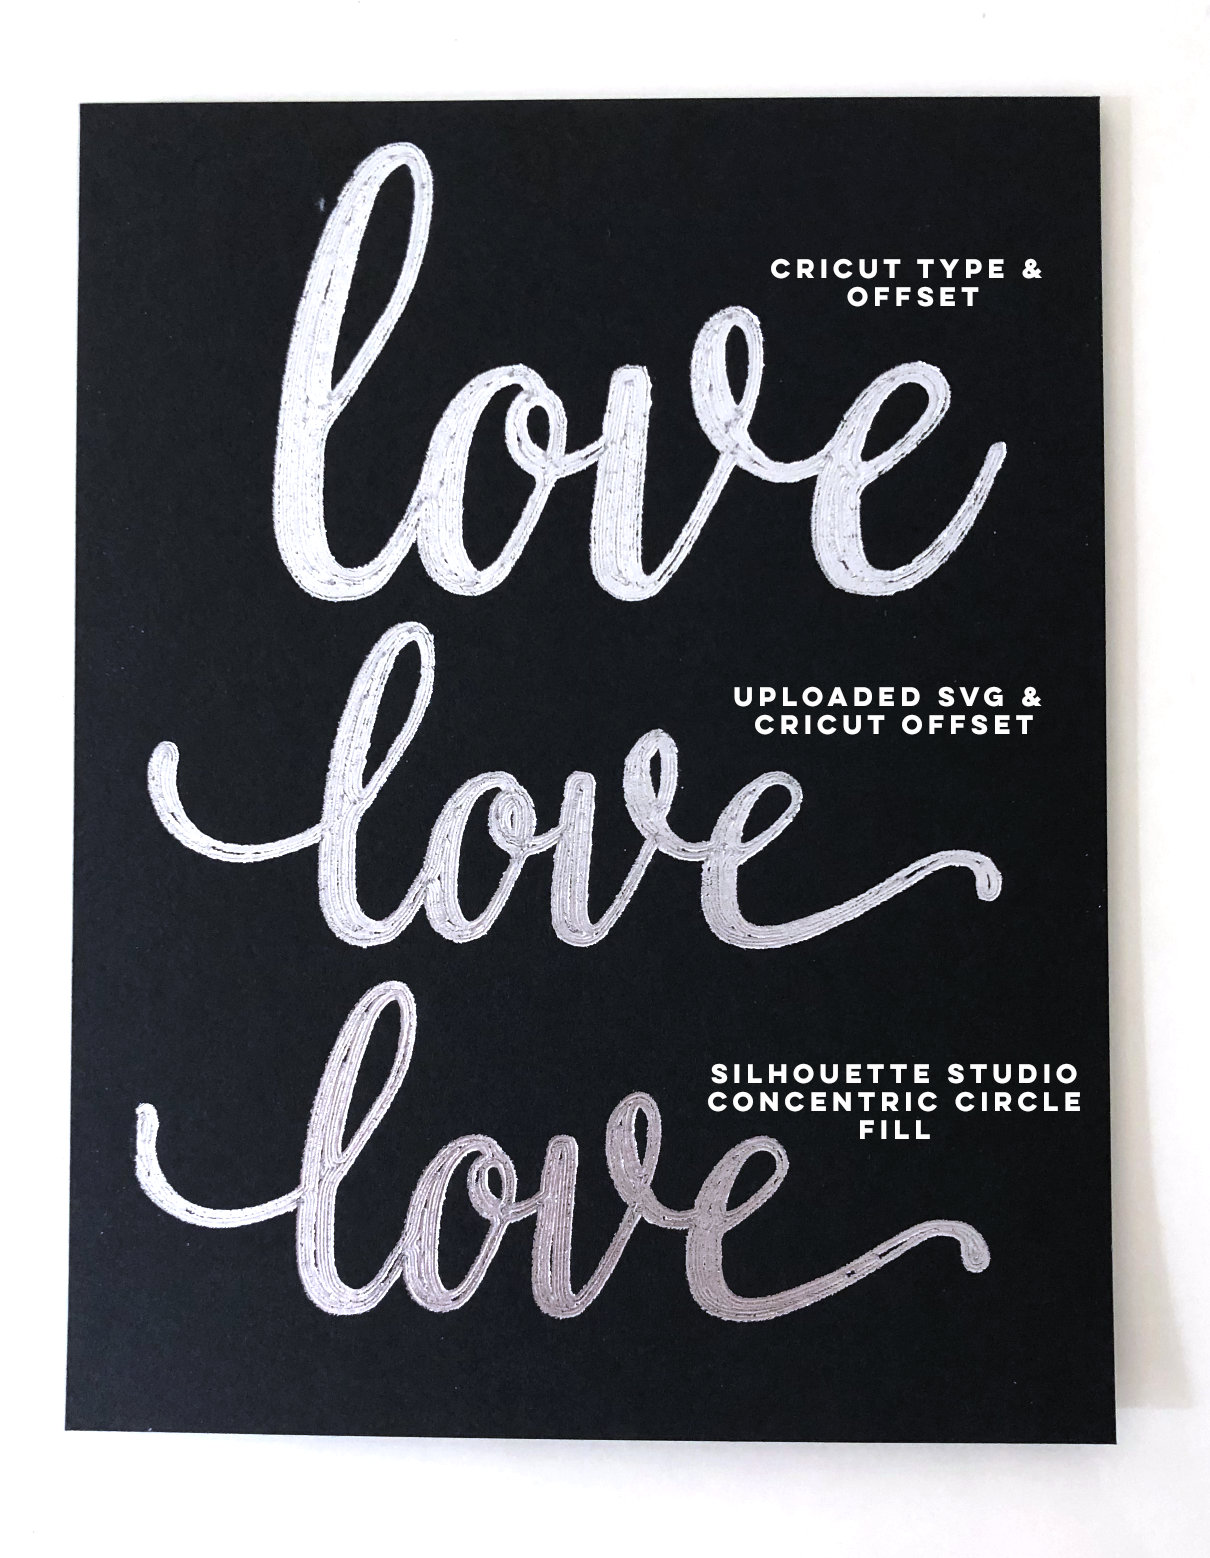
The offset feature in Cricut Design Space finally offers a way to fill in letters directly in Design Space. Although, this is far from my favorite method for filling in letters, it’s another useful technique to have in your arsenal.

Cricut Design Space - Filled Letters using Offset method

This took a bit of trial and error to get an end result I was satisfied with, nothing is ever as simple as it seems with Cricut Design Space, LOL!

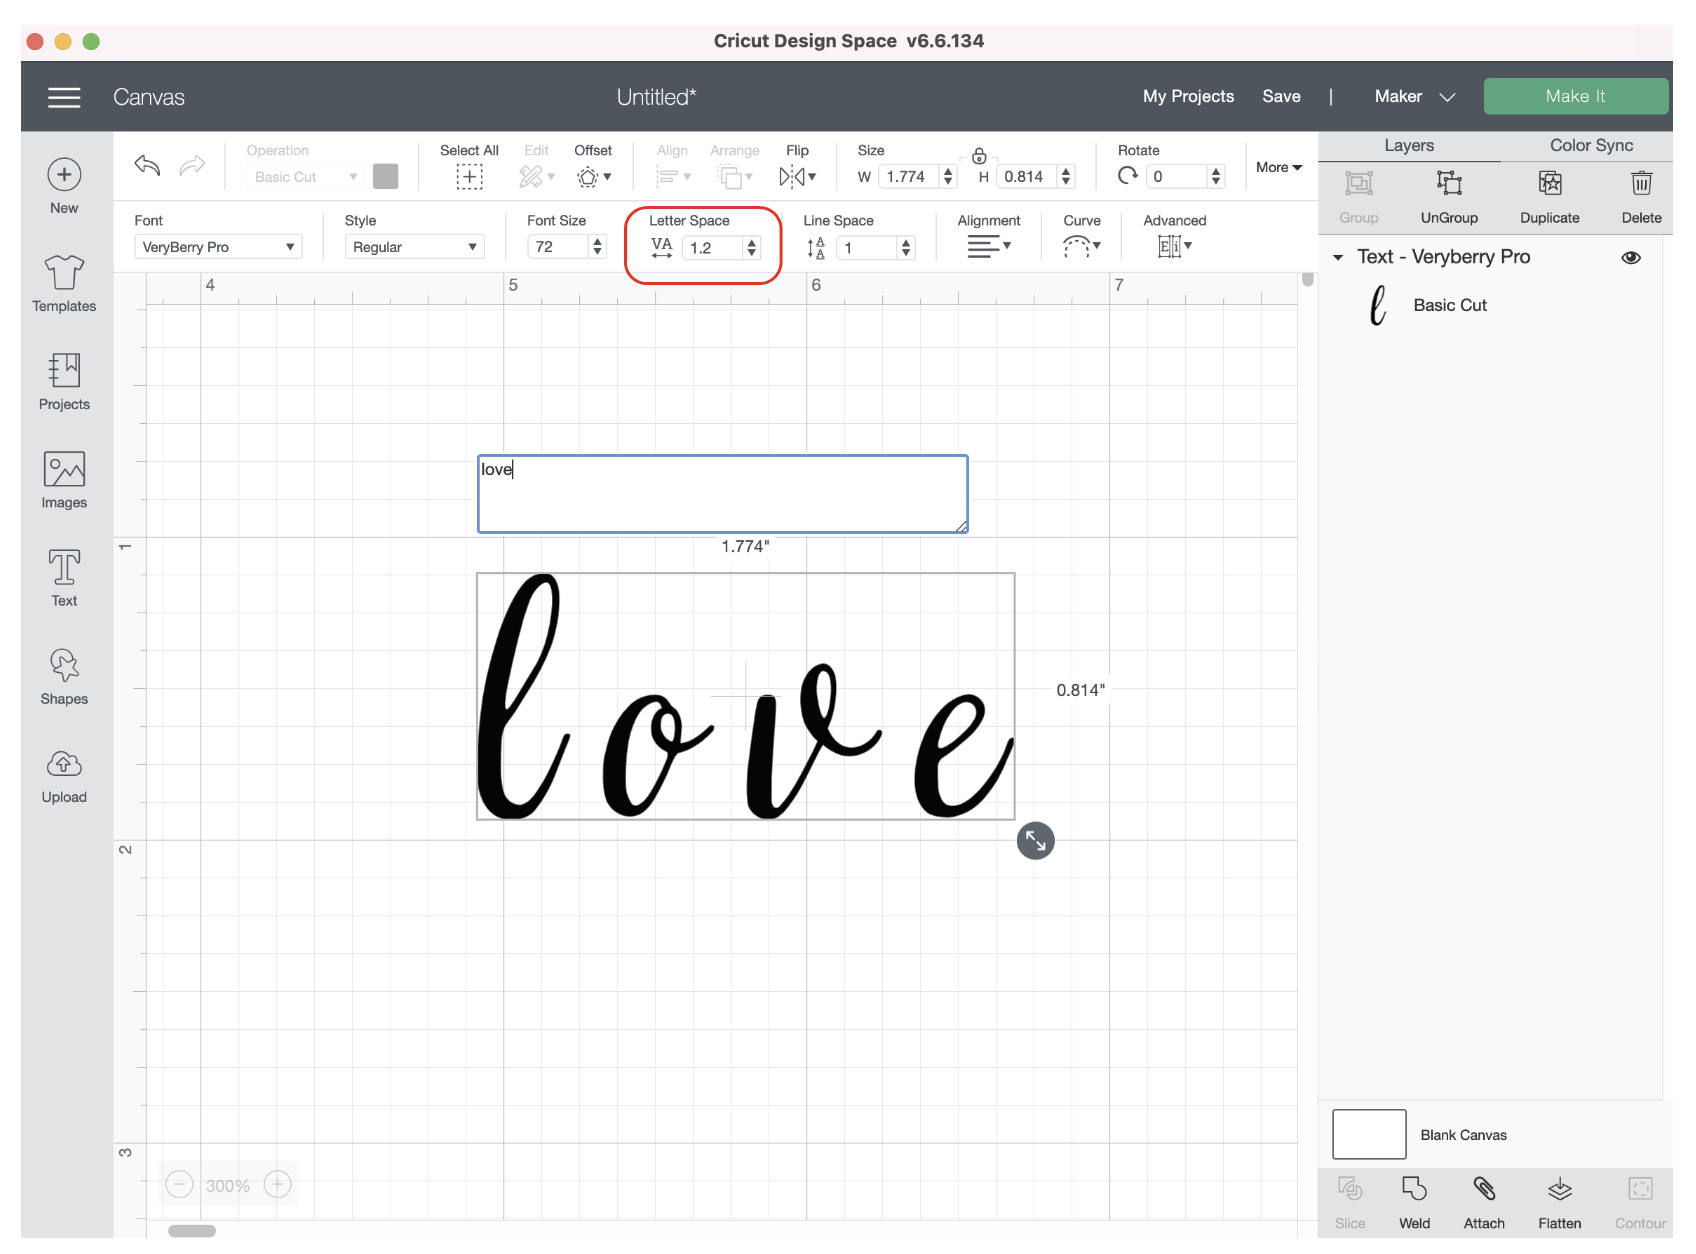
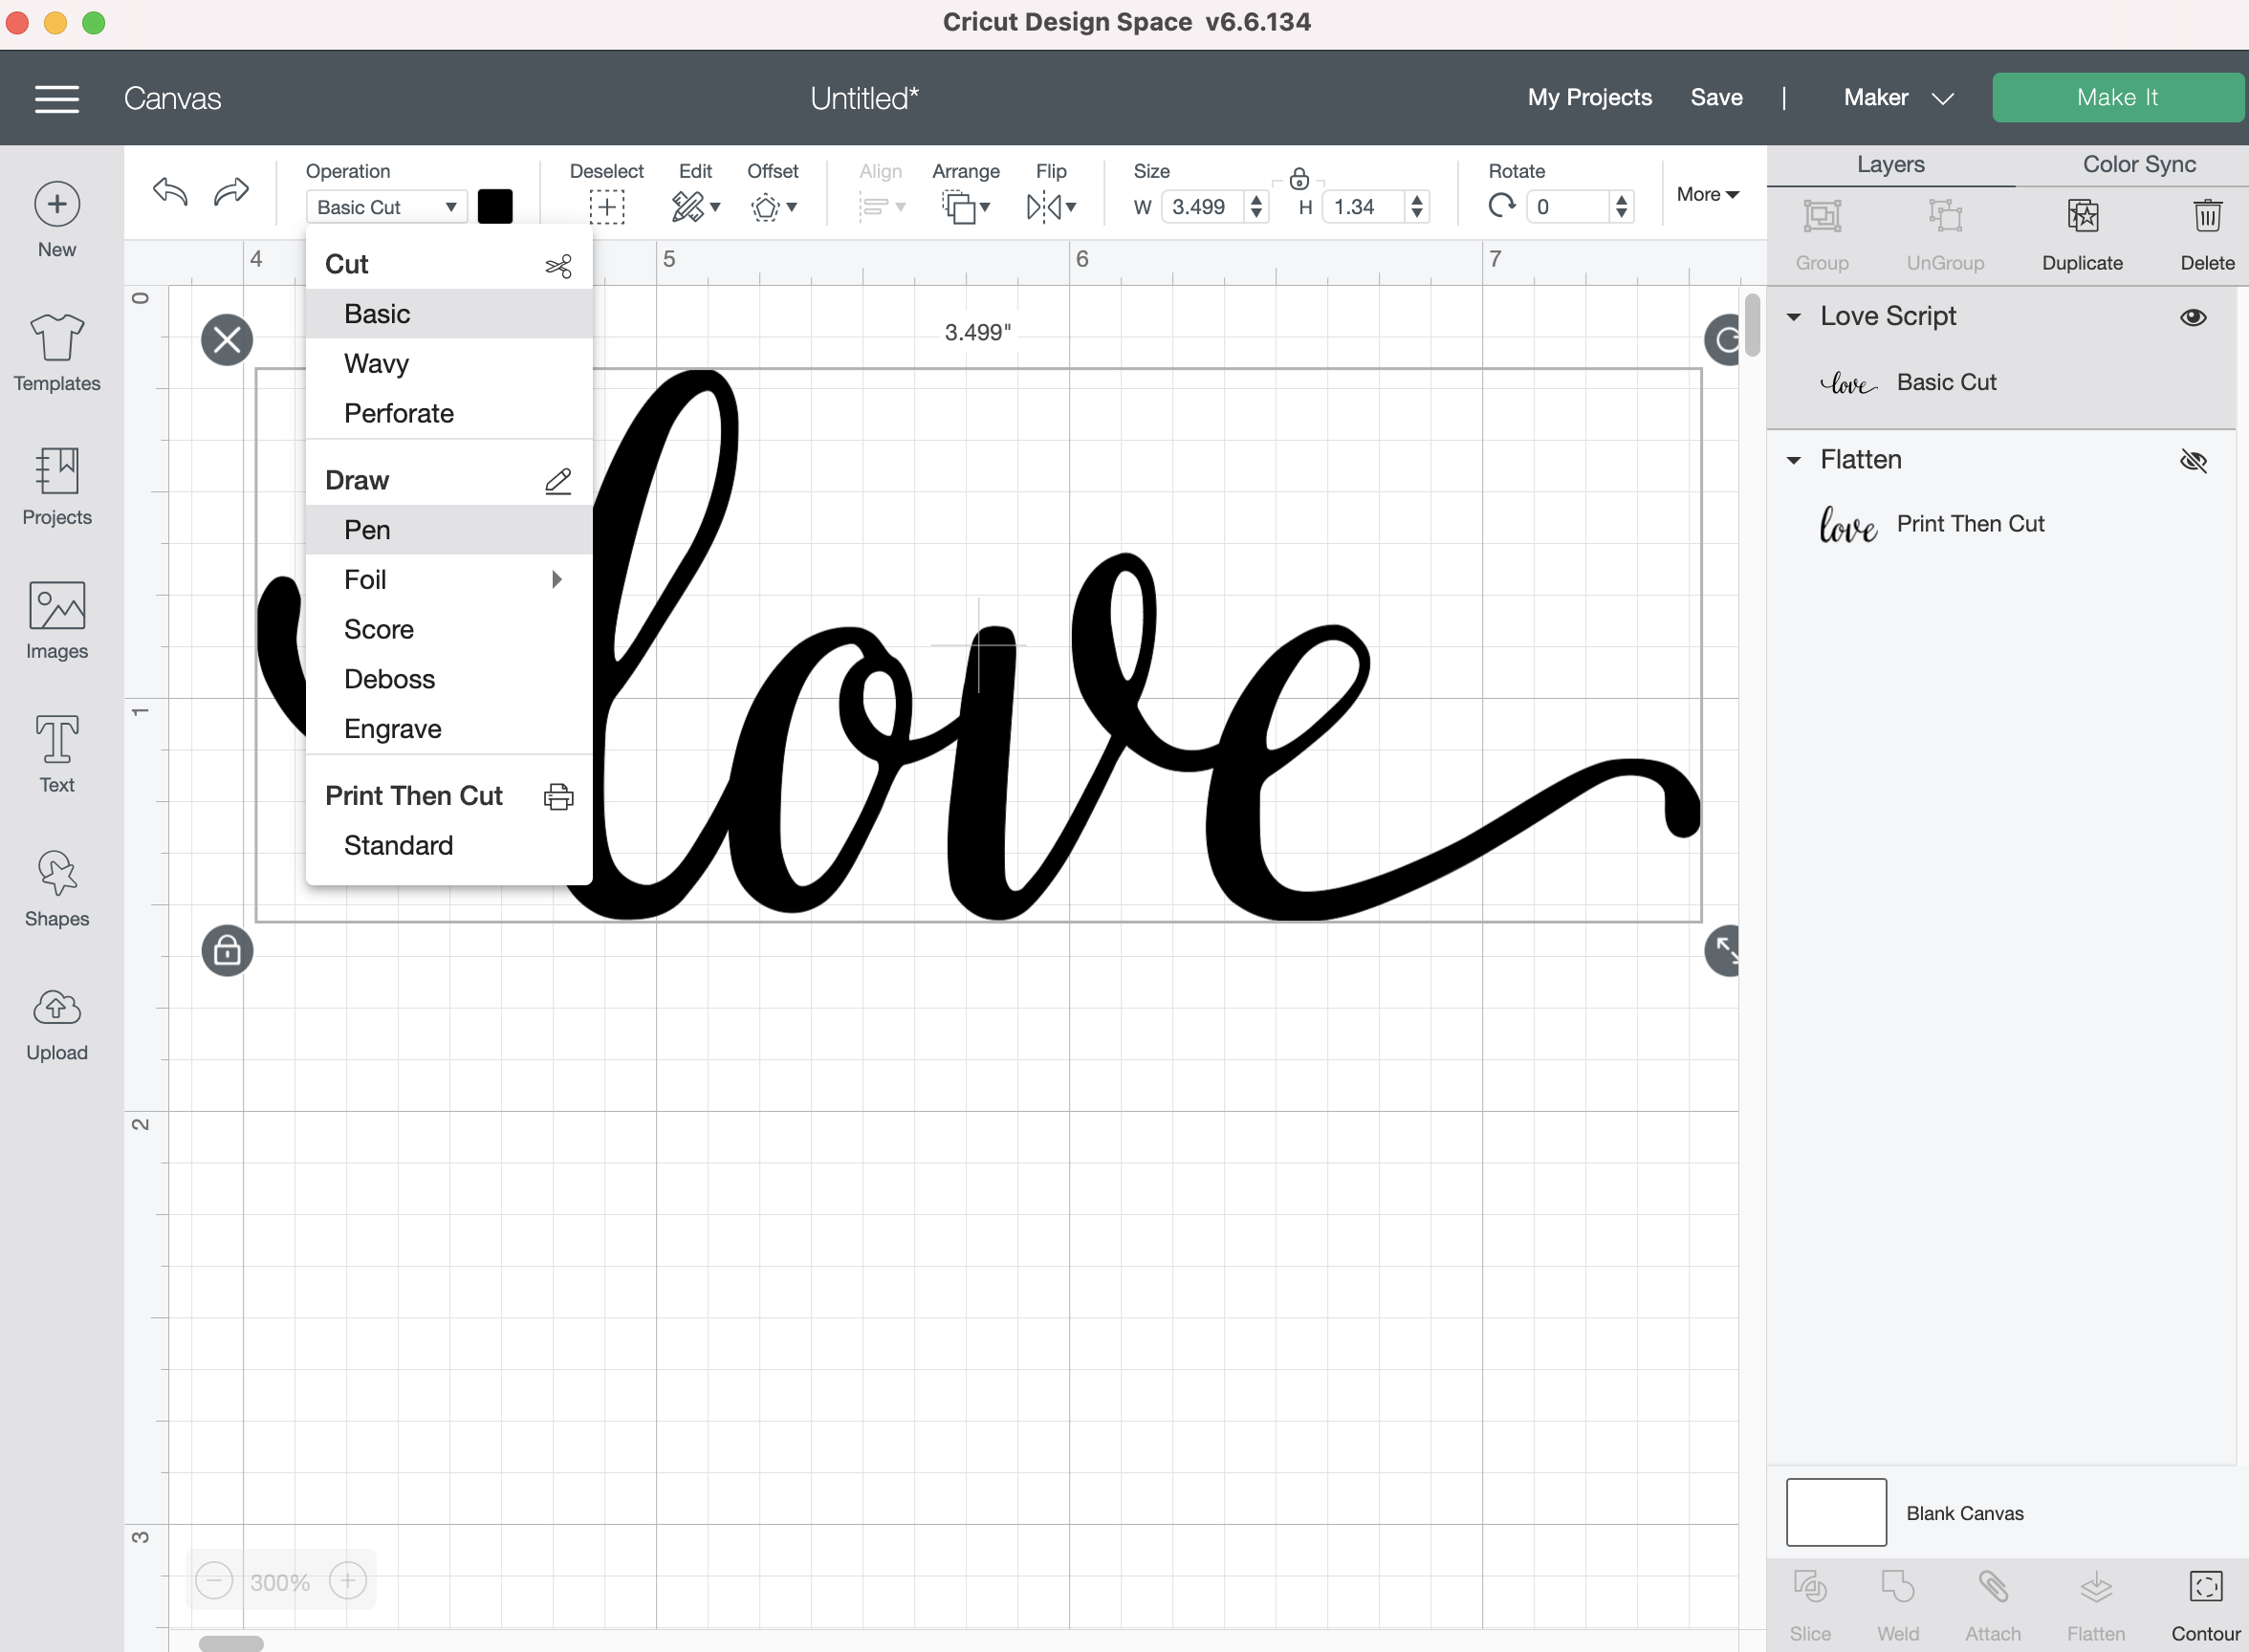
I typed the word “love” first. I’m using one of my system fonts - Very Berry. Of course the letter spacing (kerning) is absurd, so I have to adjust that first.

Filled Letters Cricut Design Space

Then in order to get the offset to behave how I want, I need to “flatten” my text layer so it becomes a “Print then Cut” layer.

filled letters Cricut design space

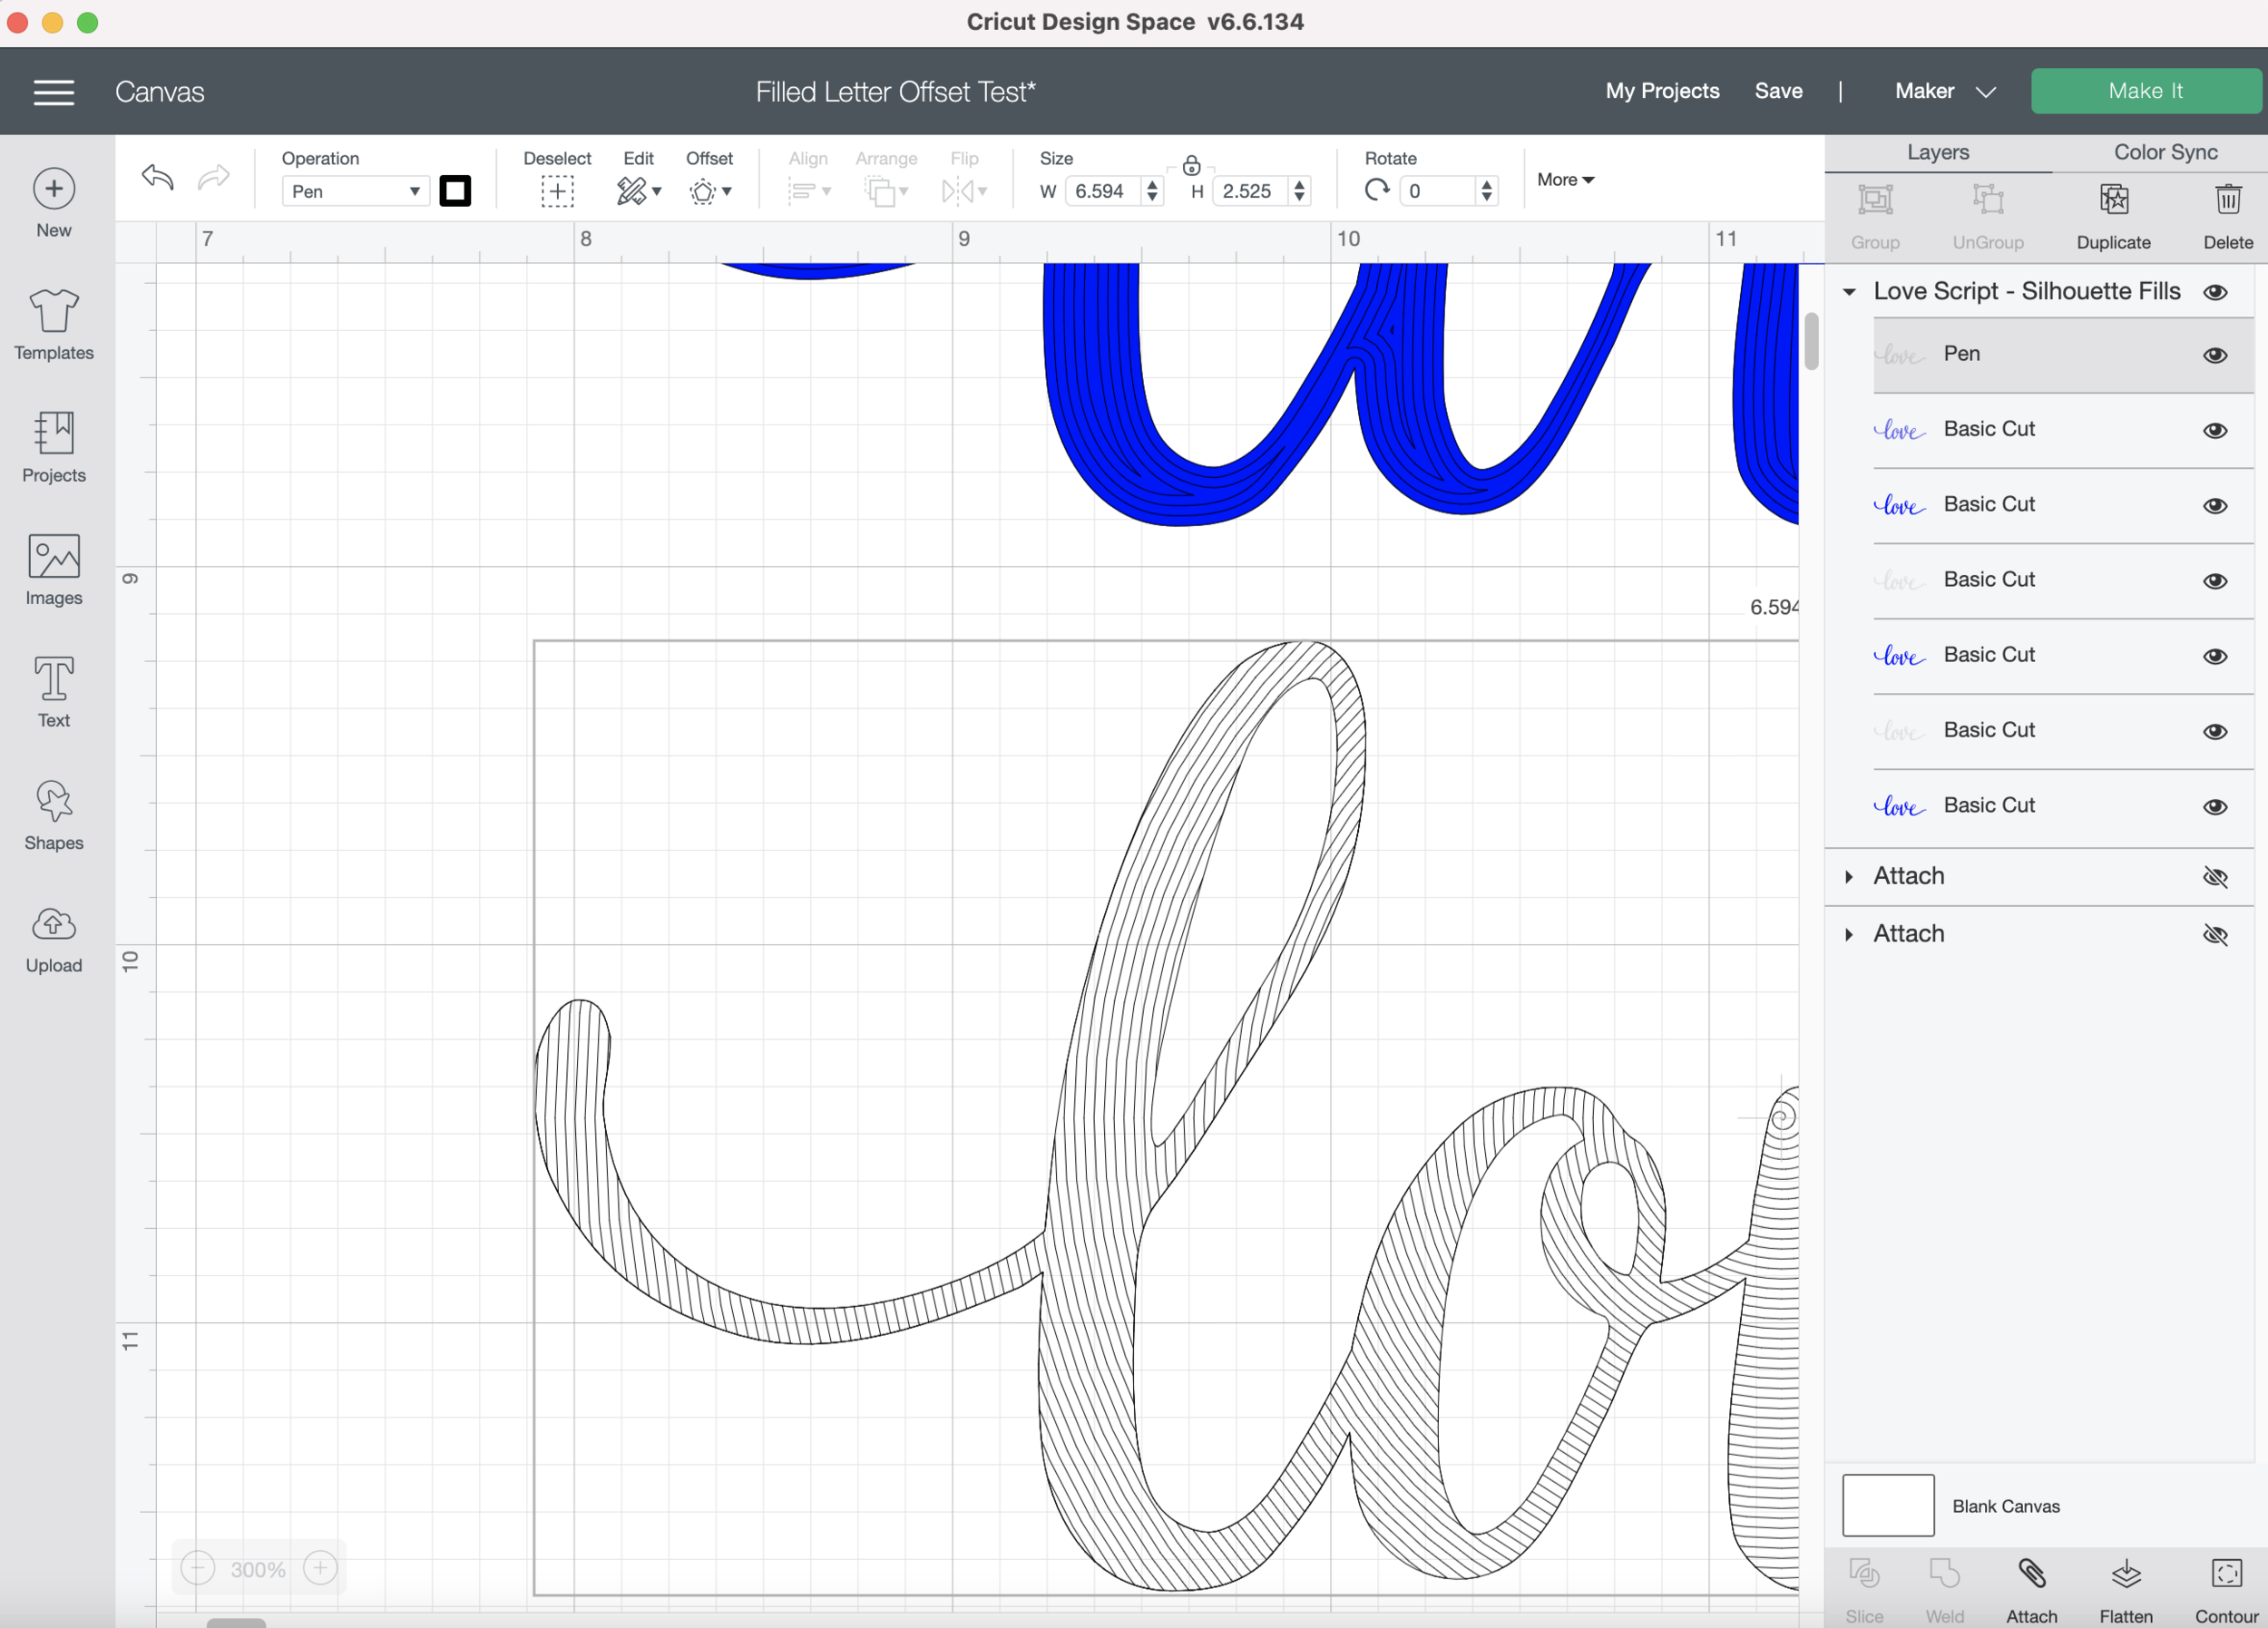
Then, with my flattened layer selected, I click on the offset button in the top tool bar. I type in -0.014 inches, that’s basically equivalent to a 1pt offset in Illustrator, which is how close I like to keep my lines if I’m going for a solid filled text. Note: You have to type -0.014 in the box, it’s such a small measurement you cannot use the slider.

Filled letters Cricut Design Space

Next, so I can actually see my offset lines, I change my offset layer to a “Draw” operation and change the line color to something bright and contrasting against the flattened black layer.

Filled letters Cricut Design Space

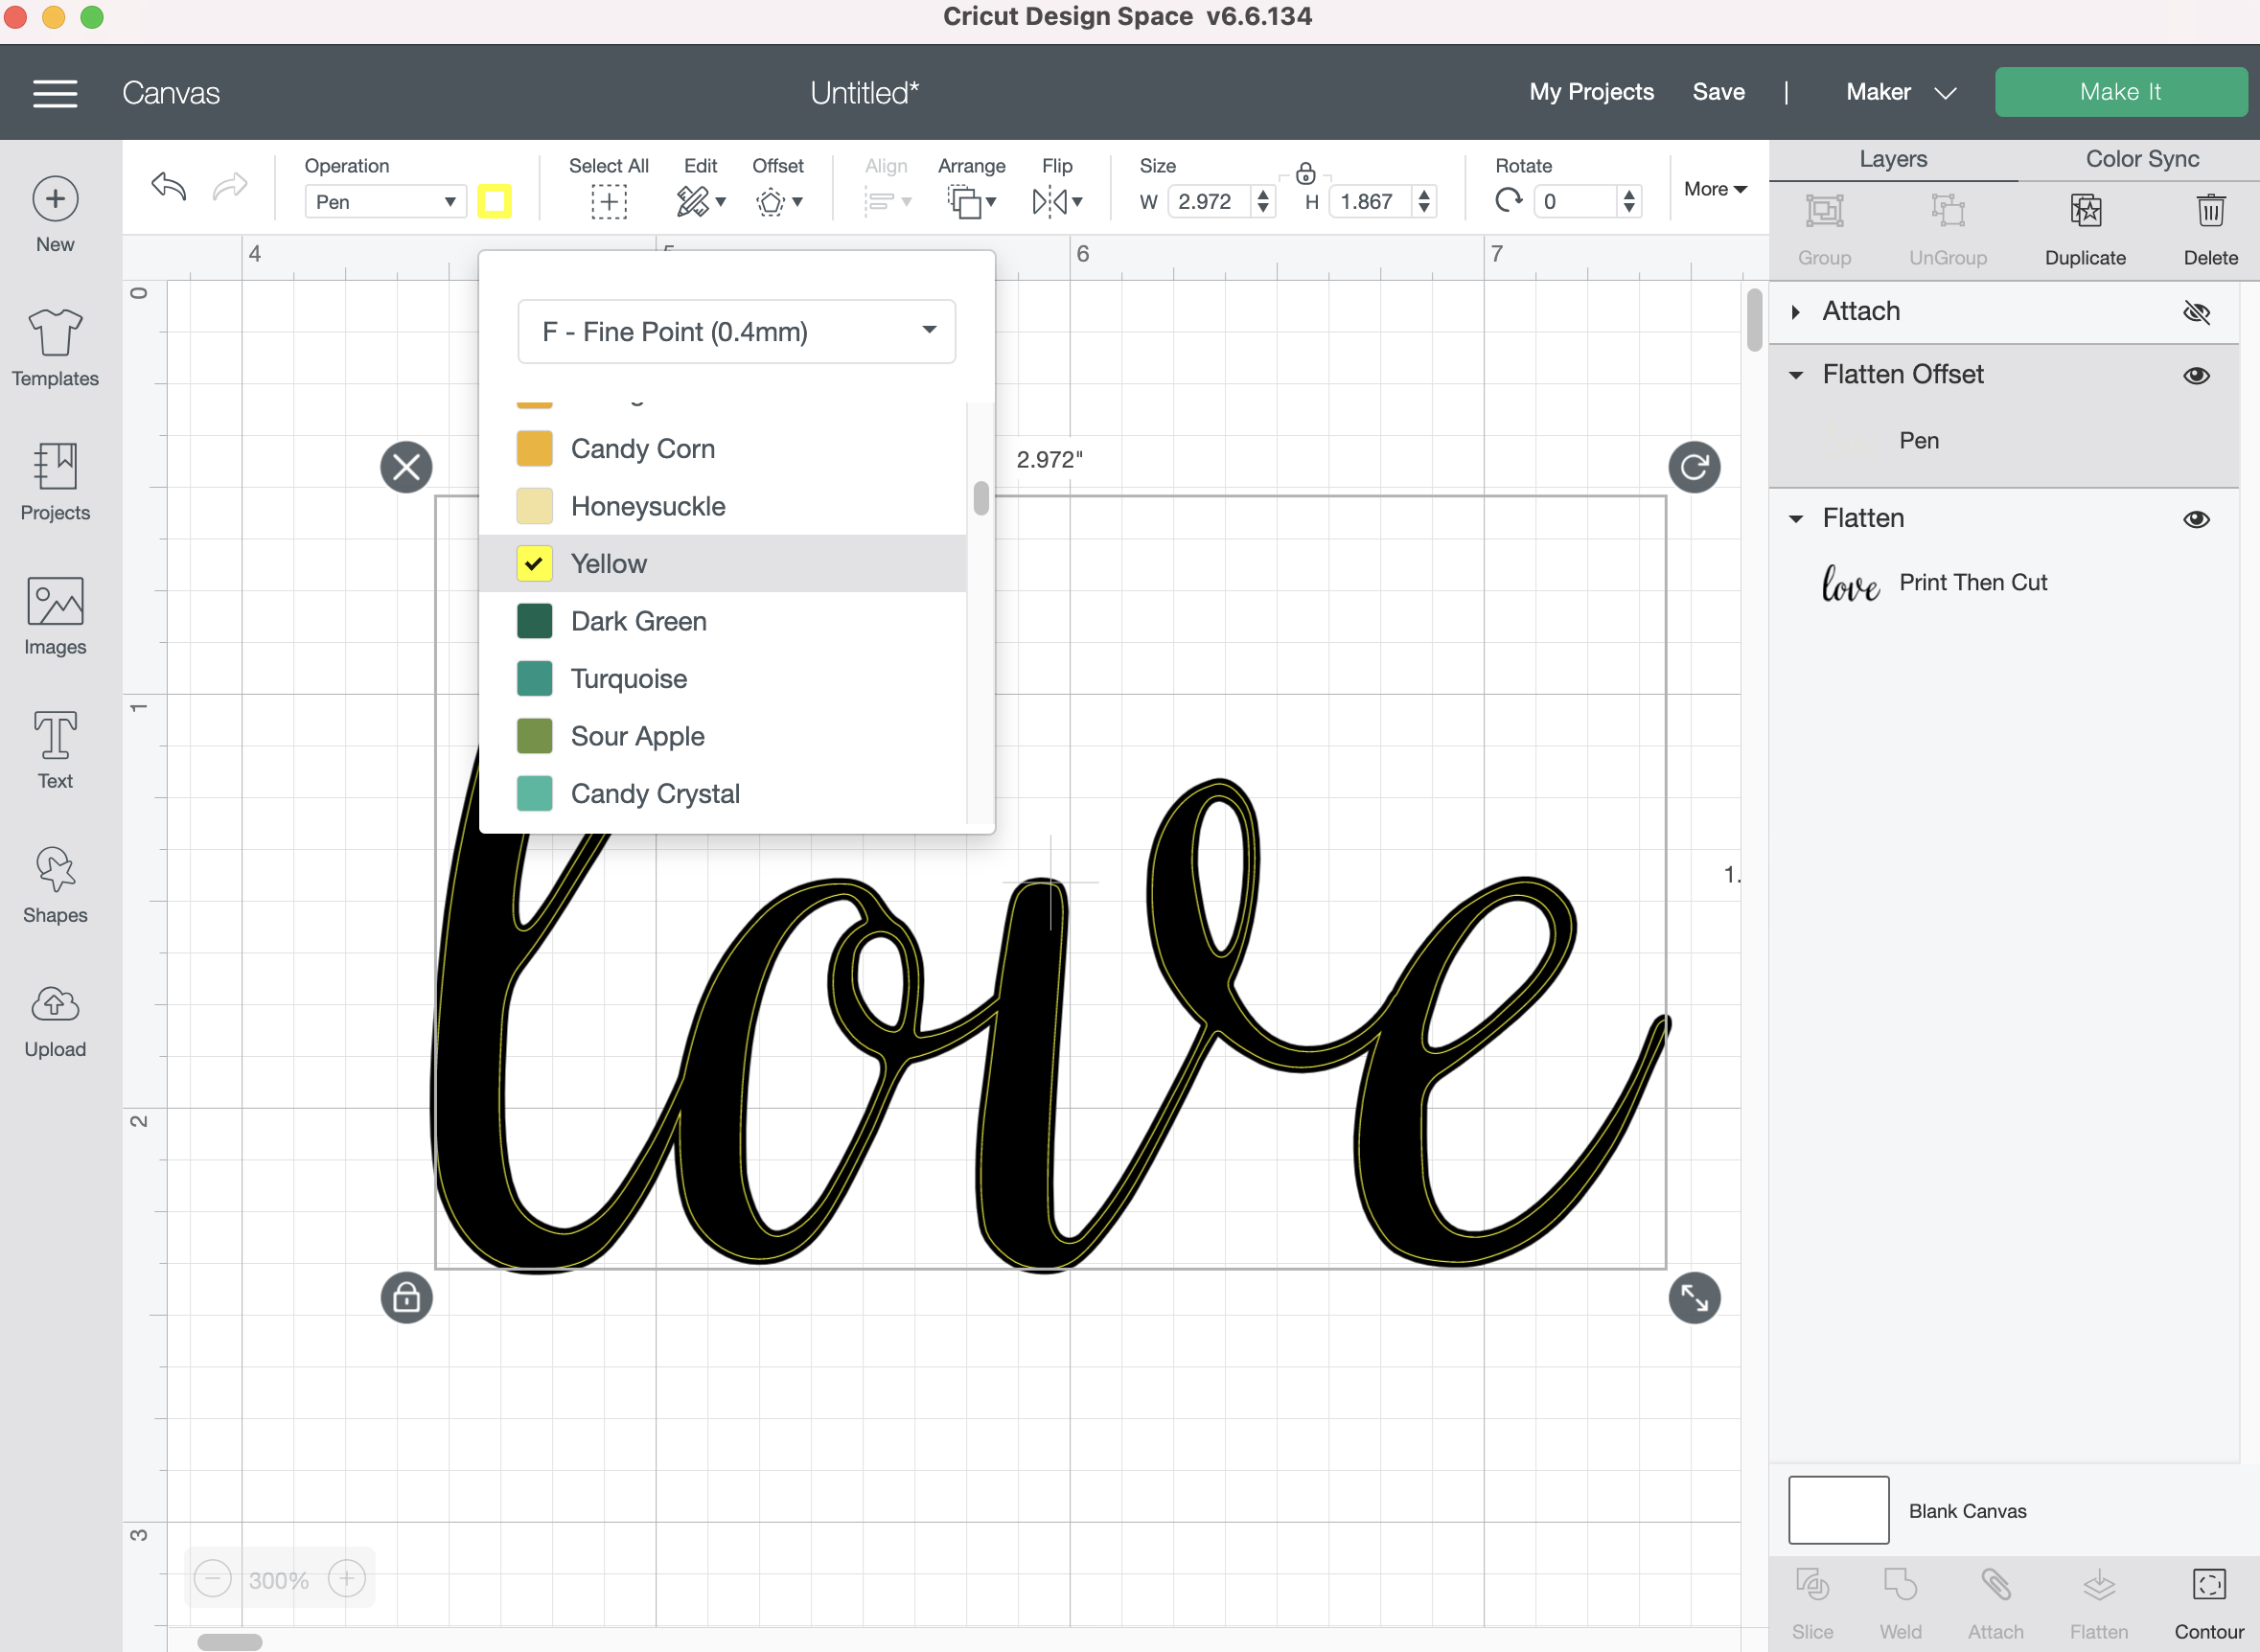
I select the offset layer I just created and then click the offset button again. It’s already set to the -0.014 inches, so I click apply. I change my line color again so I can see it against the flattened black layer.

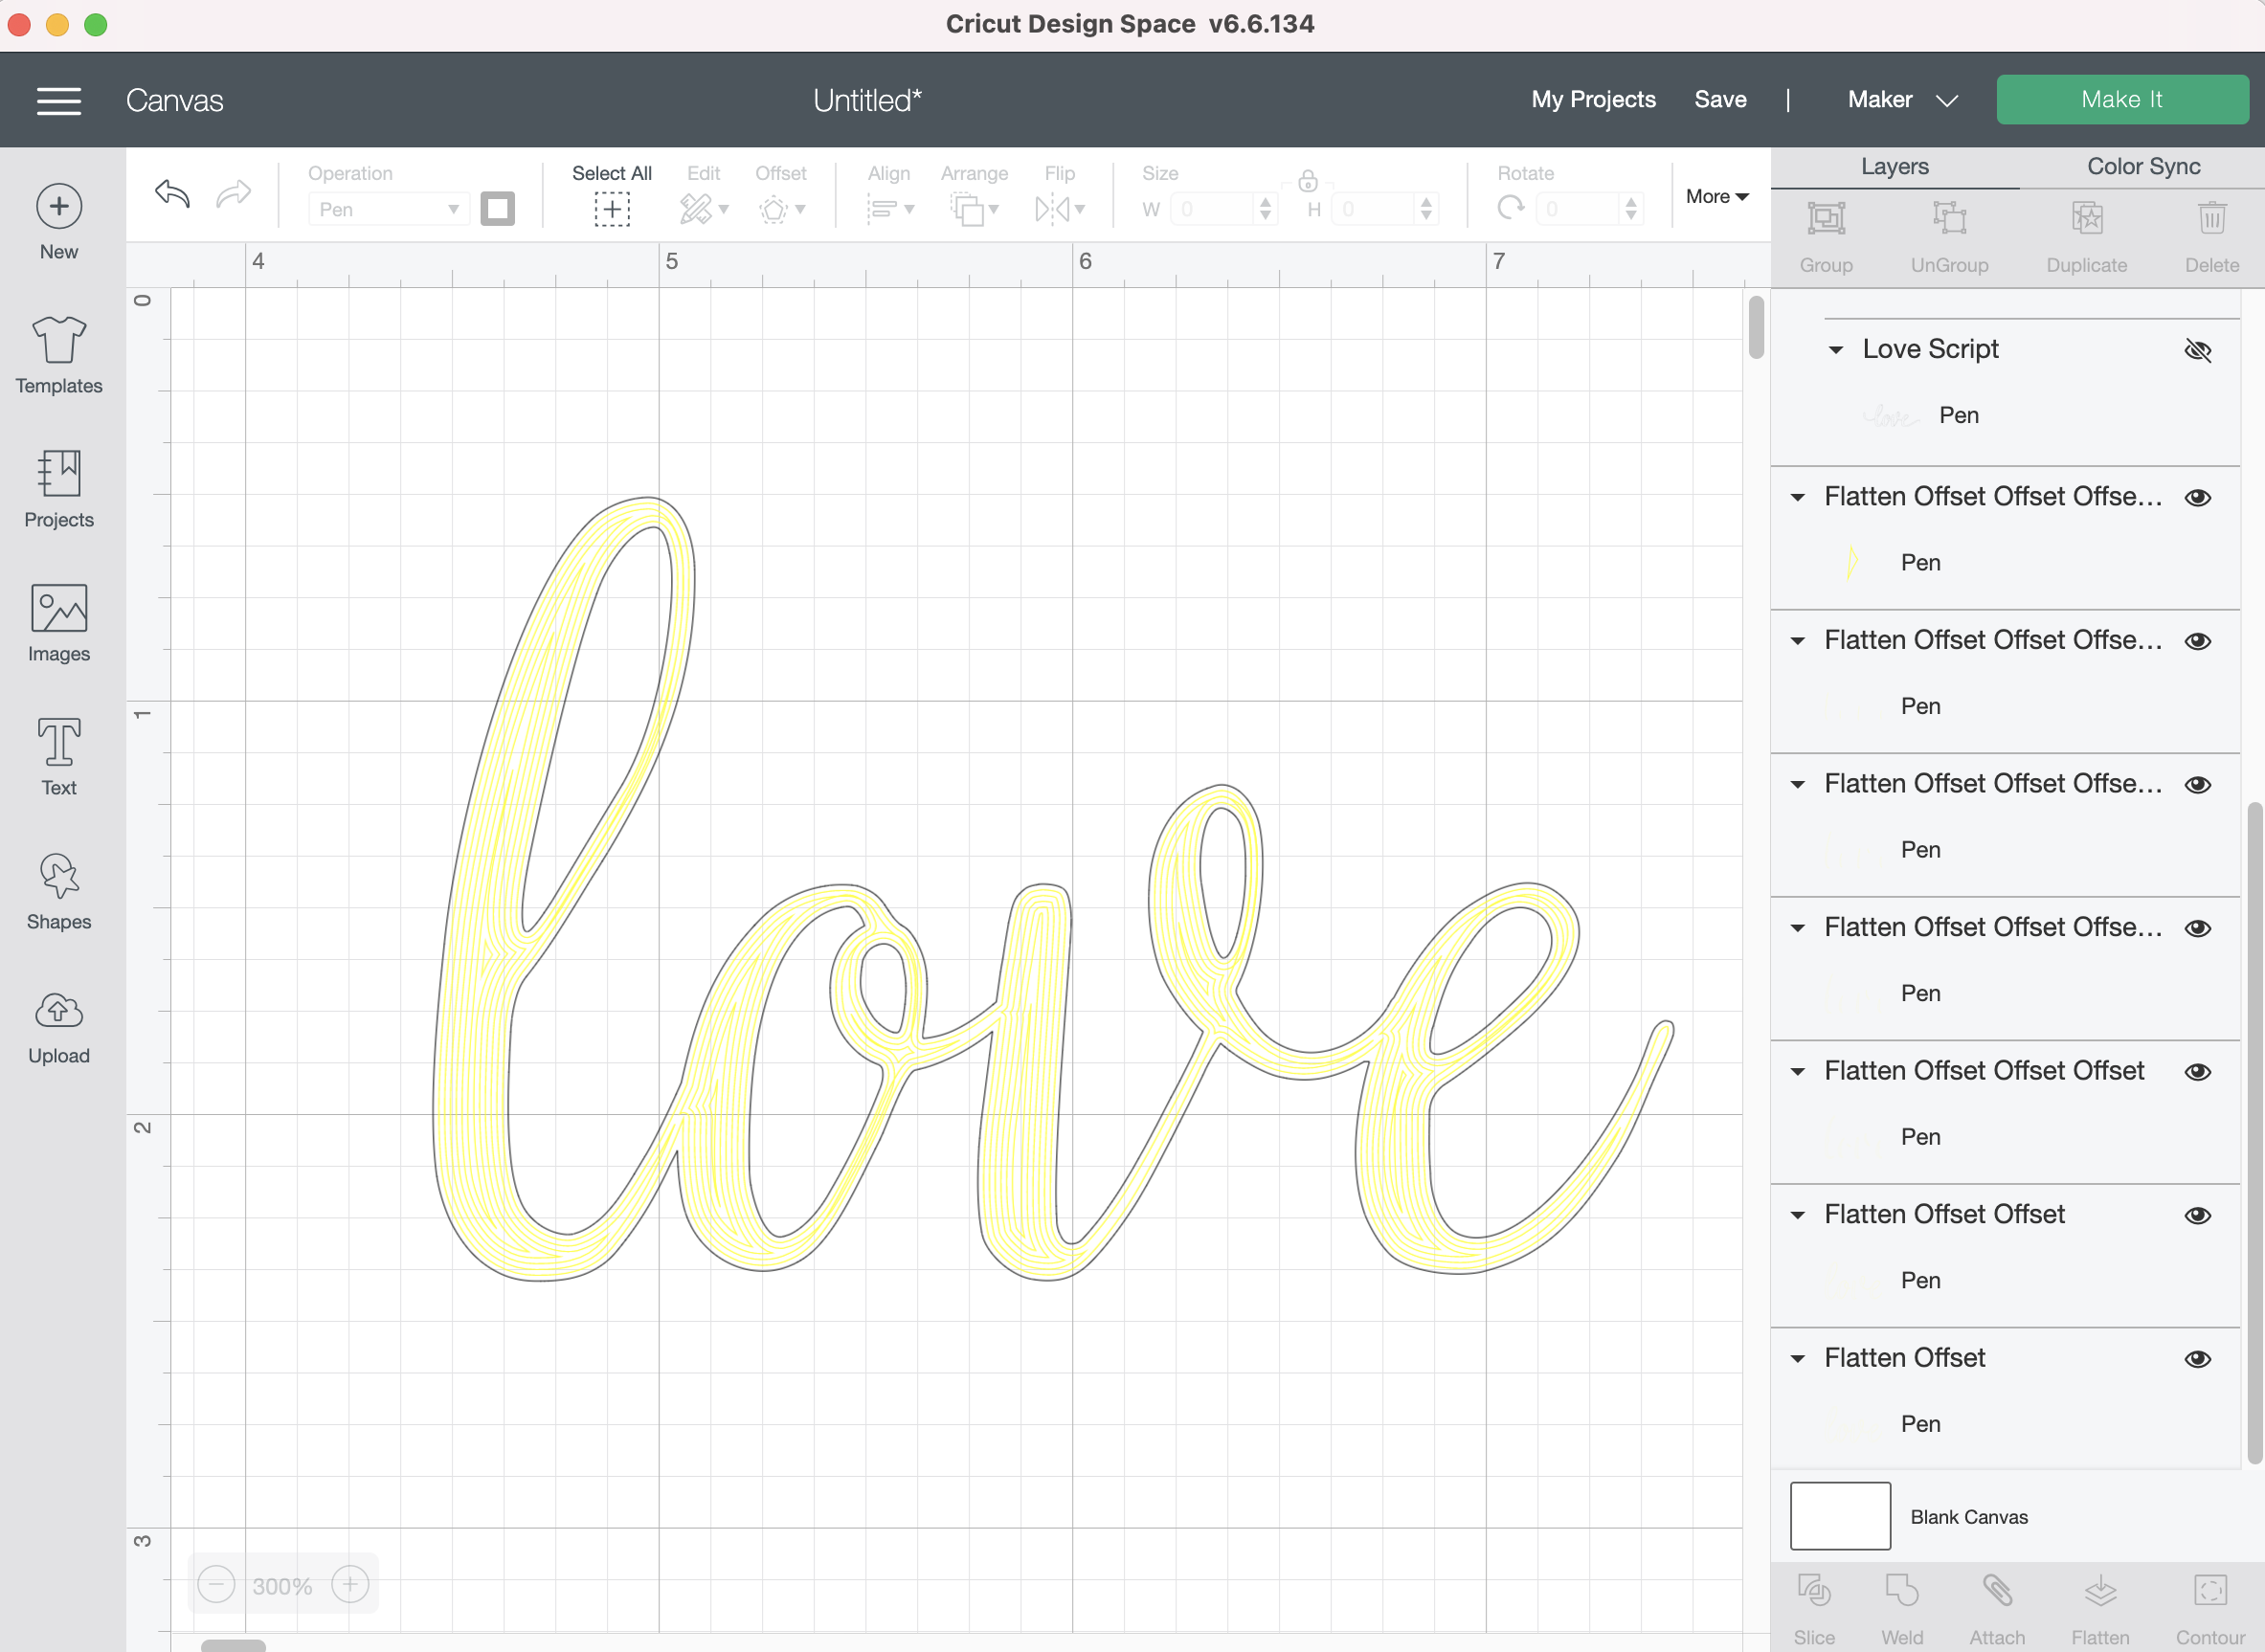
I keep repeating the same offset until I get my letters filled as much as I can.

Filled letters Cricut Design Space

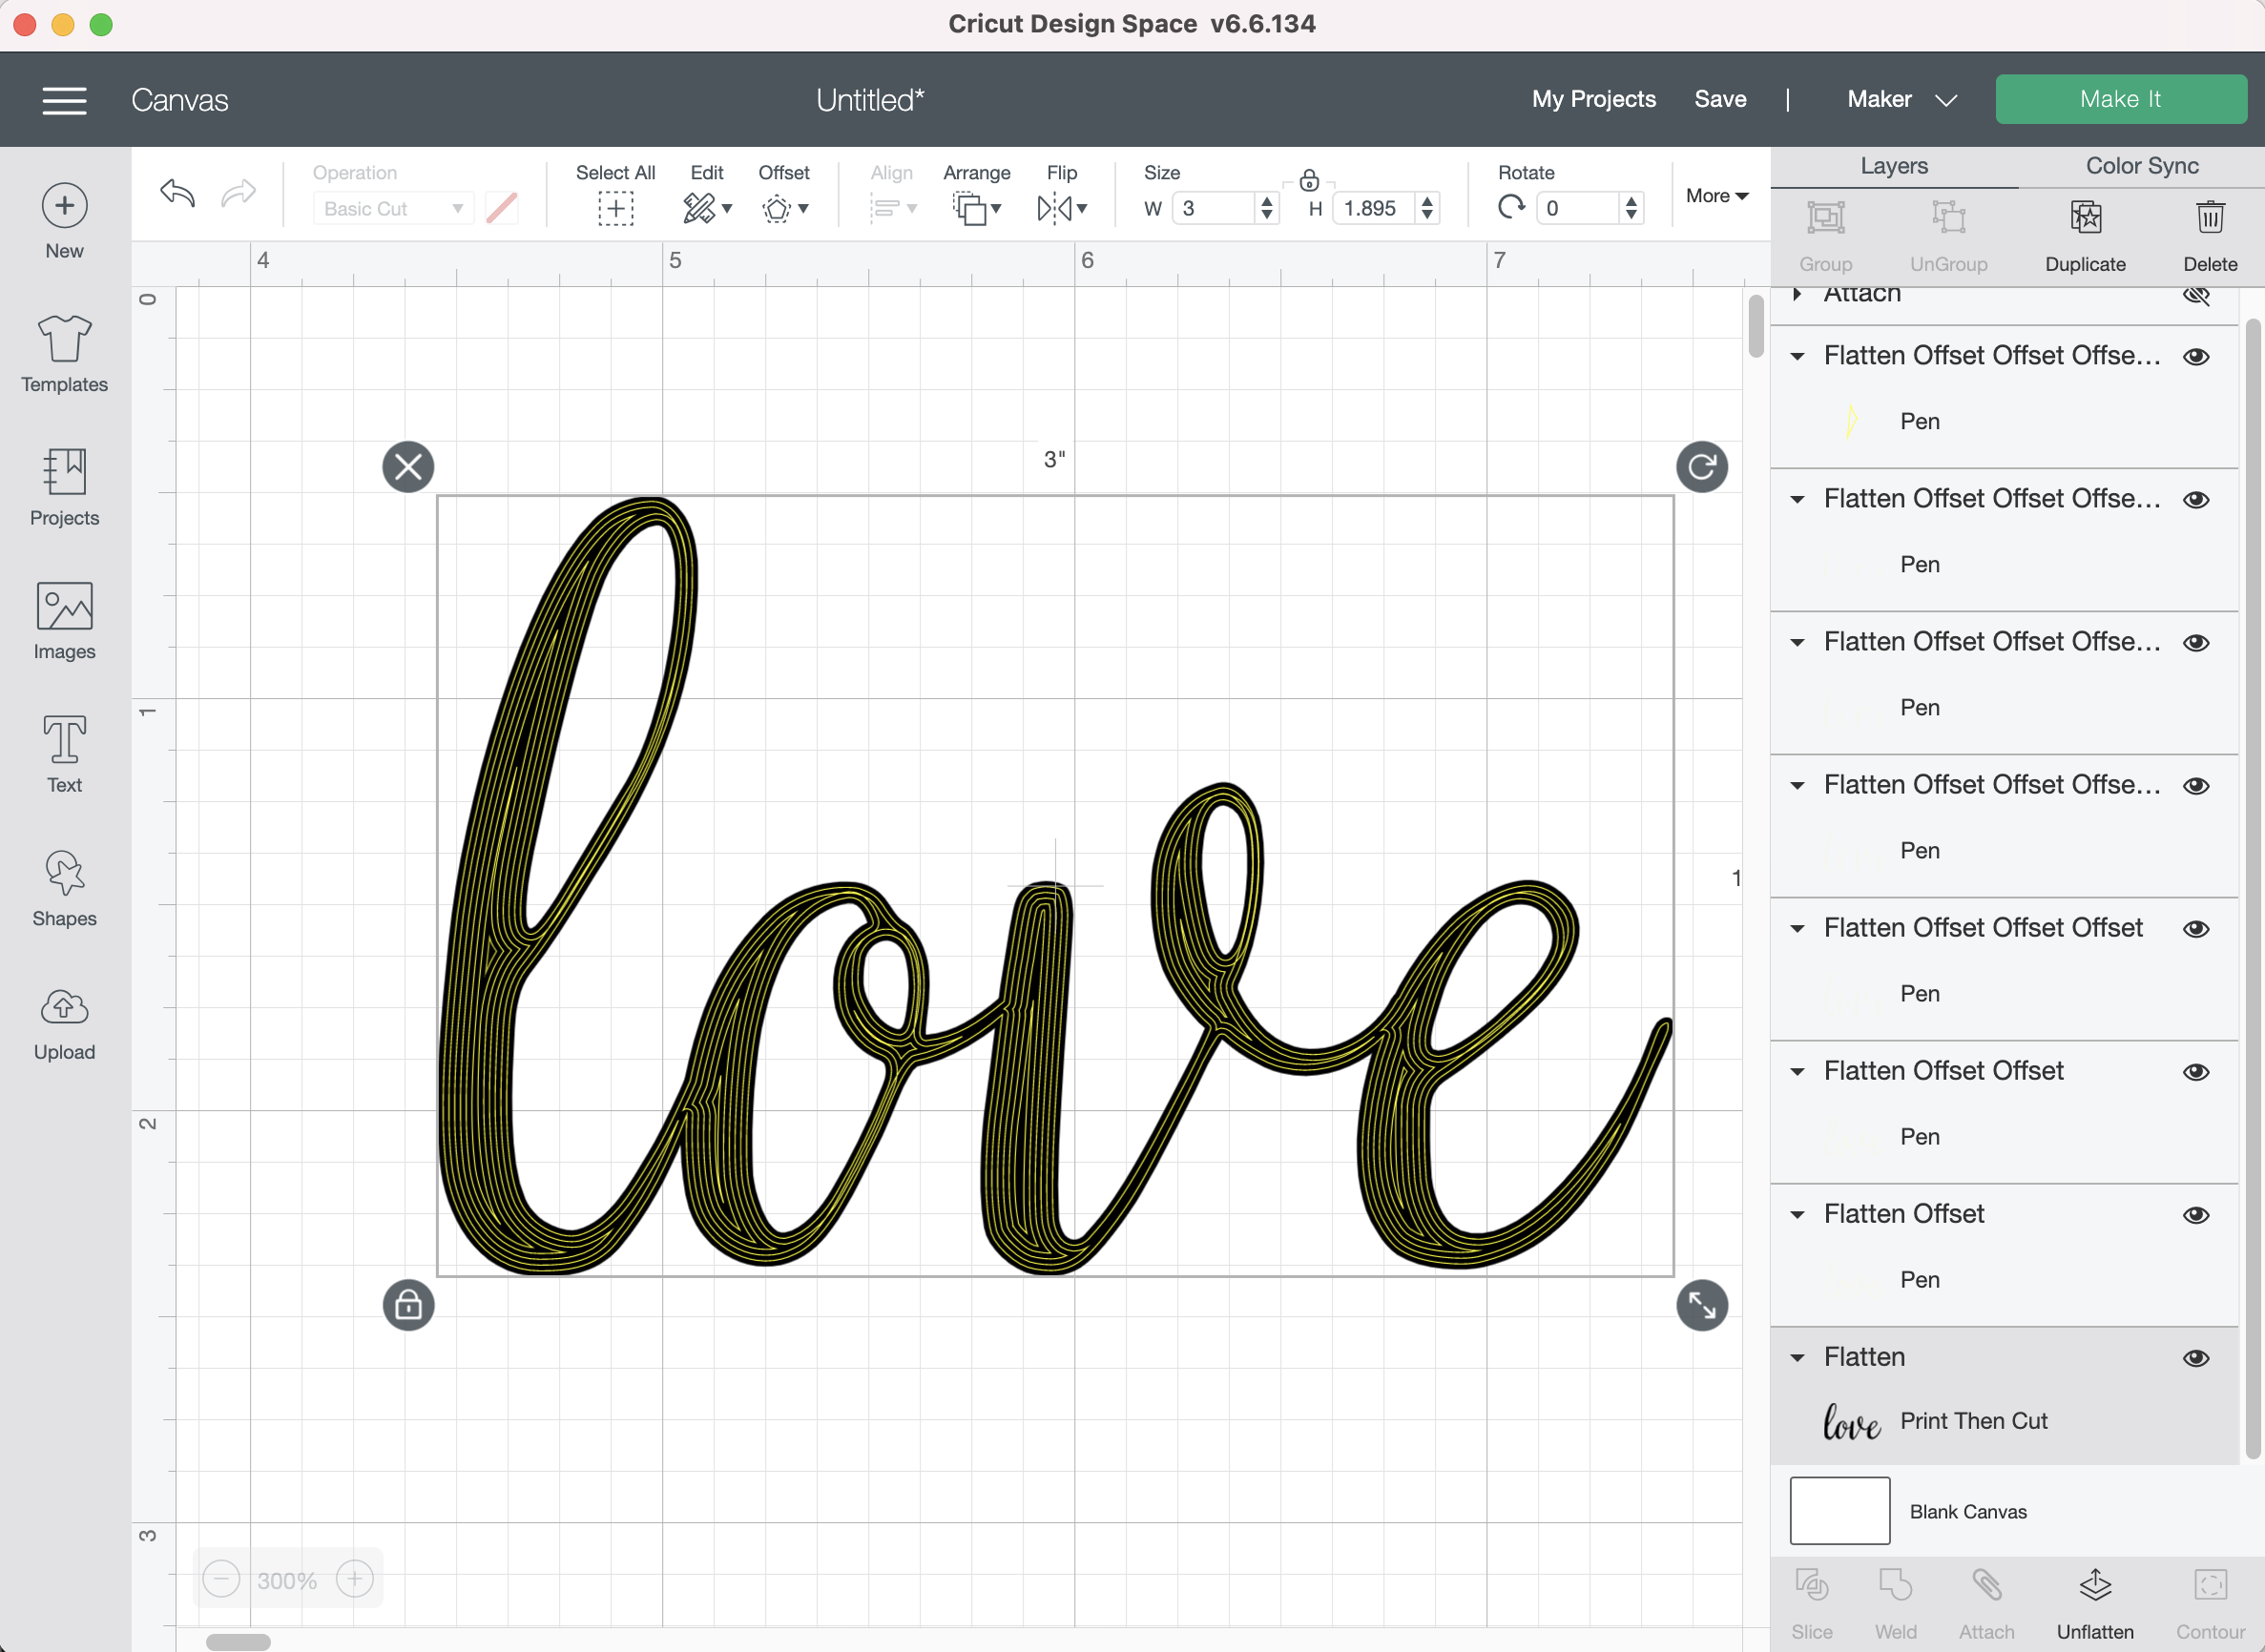
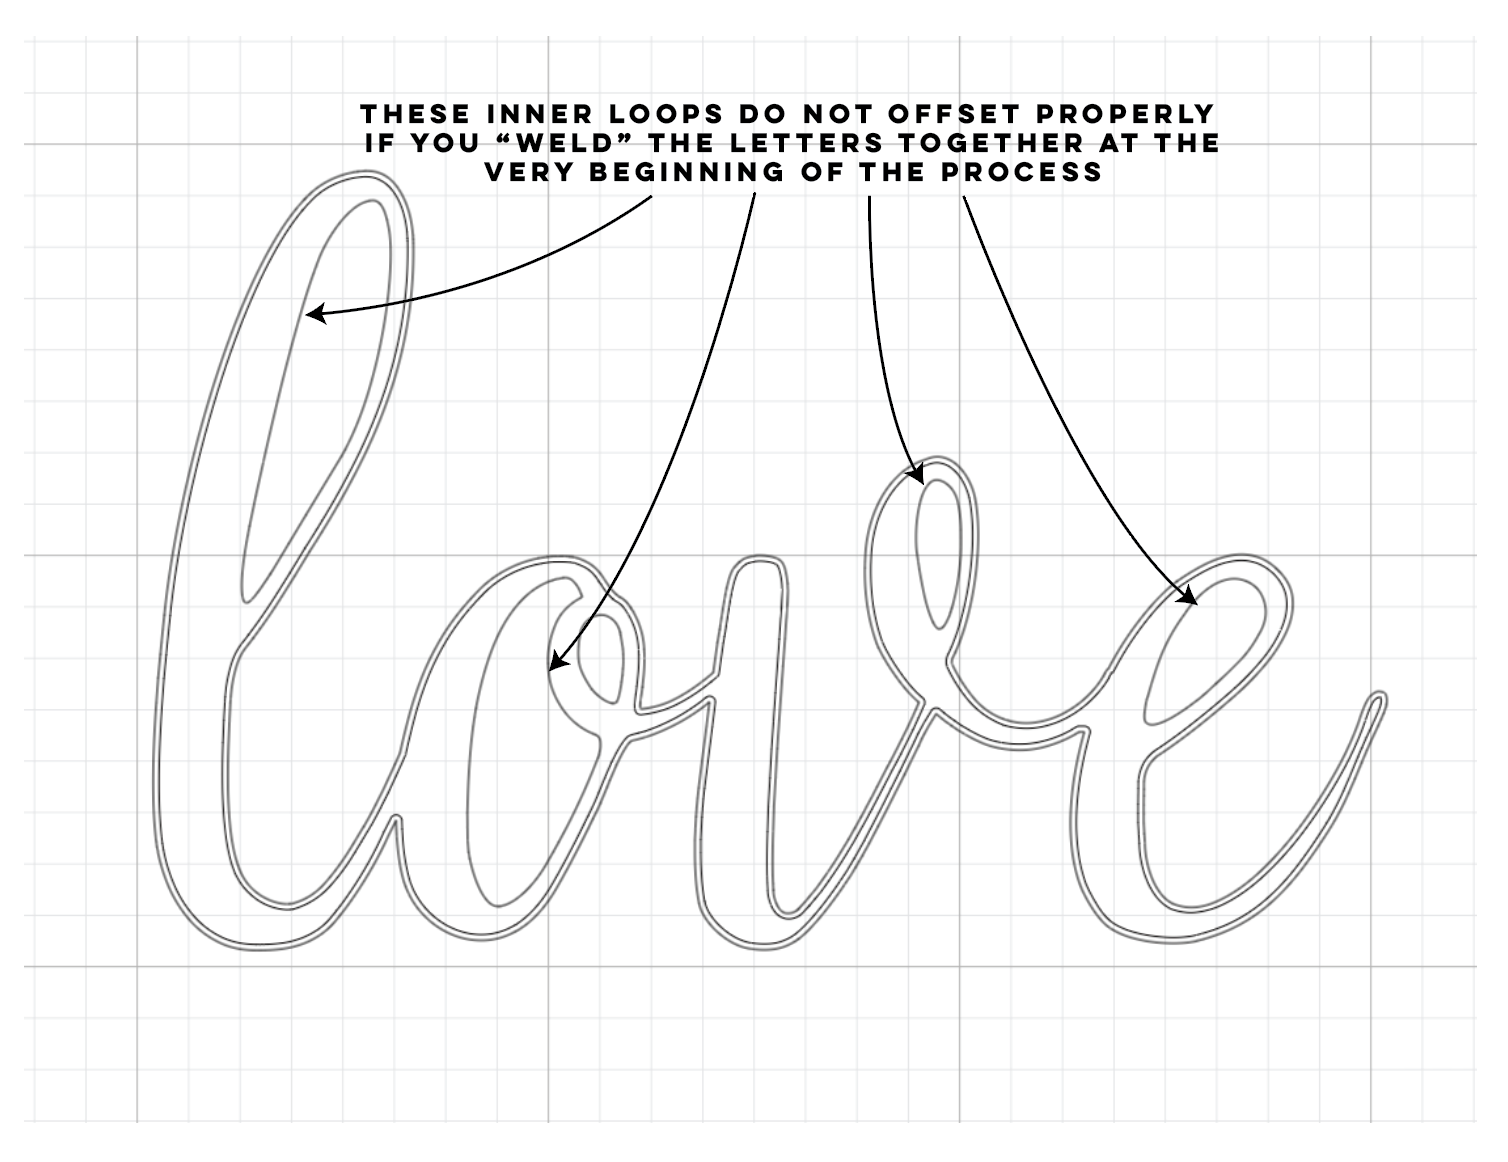
Once it’s all filled in with the offset lines, I select my original Flattened layer and “Unflatten” it. Then I “weld” the letters together.

Filled letters Cricut Design Space

Note: You CANNOT weld the letters together at the very beginning, the inner loops of the letters will not be offset properly.

Filled letters Cricut Design Space

I also tried the process with an SVG file that I imported from Illustrator. I prefer creating my words in Illustrator first, it’s much easier to adjust the kerning and use any special glyphs.

I upload my SVG as usual and change my Linetype from “Basic Cut” a “Draw” linetype.

Filled letters Cricut Design Space

Then I applied the -0.014 inch offset to the offset over and over again until my word was filled as much as possible.

Filled letters Cricut Design Space

After I show you the Silhouette Studio method we will test all the different fills on my Cricut Maker Machine.

Silhouette Studio - Filled Letters

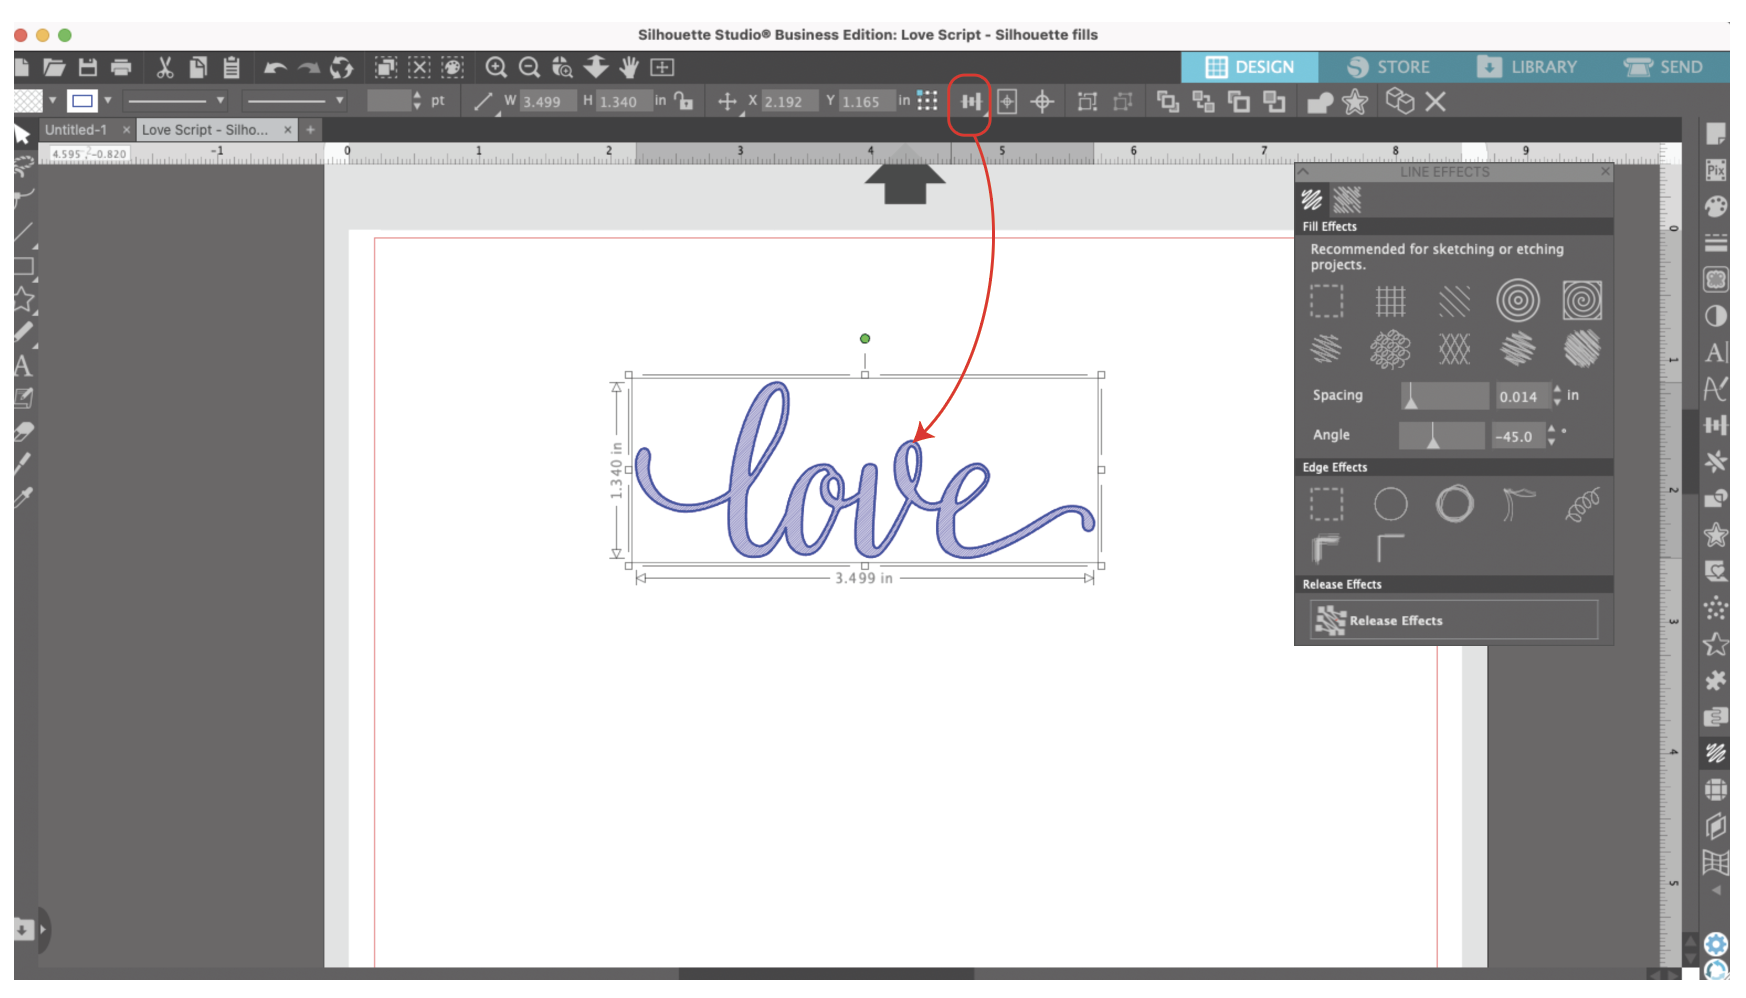
Silhouette Studio has an awesome Line Effects tool that you can use to fill words.

I open my same SVG file that I created in Illustrator and click on the Line Effects tool on the right tool bar.

Filled letters Silhouette Studio

I’m going to copy and paste my word so I can use one to draw an outline completely around the word, I think that gives it a cleaner look.

There are a few different line types you can use for fills. The first one I’m going to pick is the just the straight lines. It’s simple and it’s one of my favorites.

It starts off looking horizontal and pretty spaced out.

Filled letters Silhouette Studio

I type my 0.014 inches in the spacing box and -45 degrees in the angle to get the close diagonal lines I’m going for.

Filled letters Silhouette Studio

I use the Align tool in the toolbar across the top to line up my fill lines with the outline.

Filled letters Silhouette Studio

Next, I duplicate both layers and then I pick the crosshatch fill. I’m going to keep my spacing at 0.014 inches and a -45 degree angle.

Filled letters Silhouette Studio

I duplicate my words again and I pick the concentric circles, this gives the same look as the offset in Cricut Design Space. I keep my spacing at 0.014 inches.

Filled letters Silhouette Studio

The last one I’m going to try is the spiral. It already has an outline so I can delete one of my layers. I keep my spacing at 0.014 inches and my angle at -45 degrees.

Filled letters Silhouette Studio

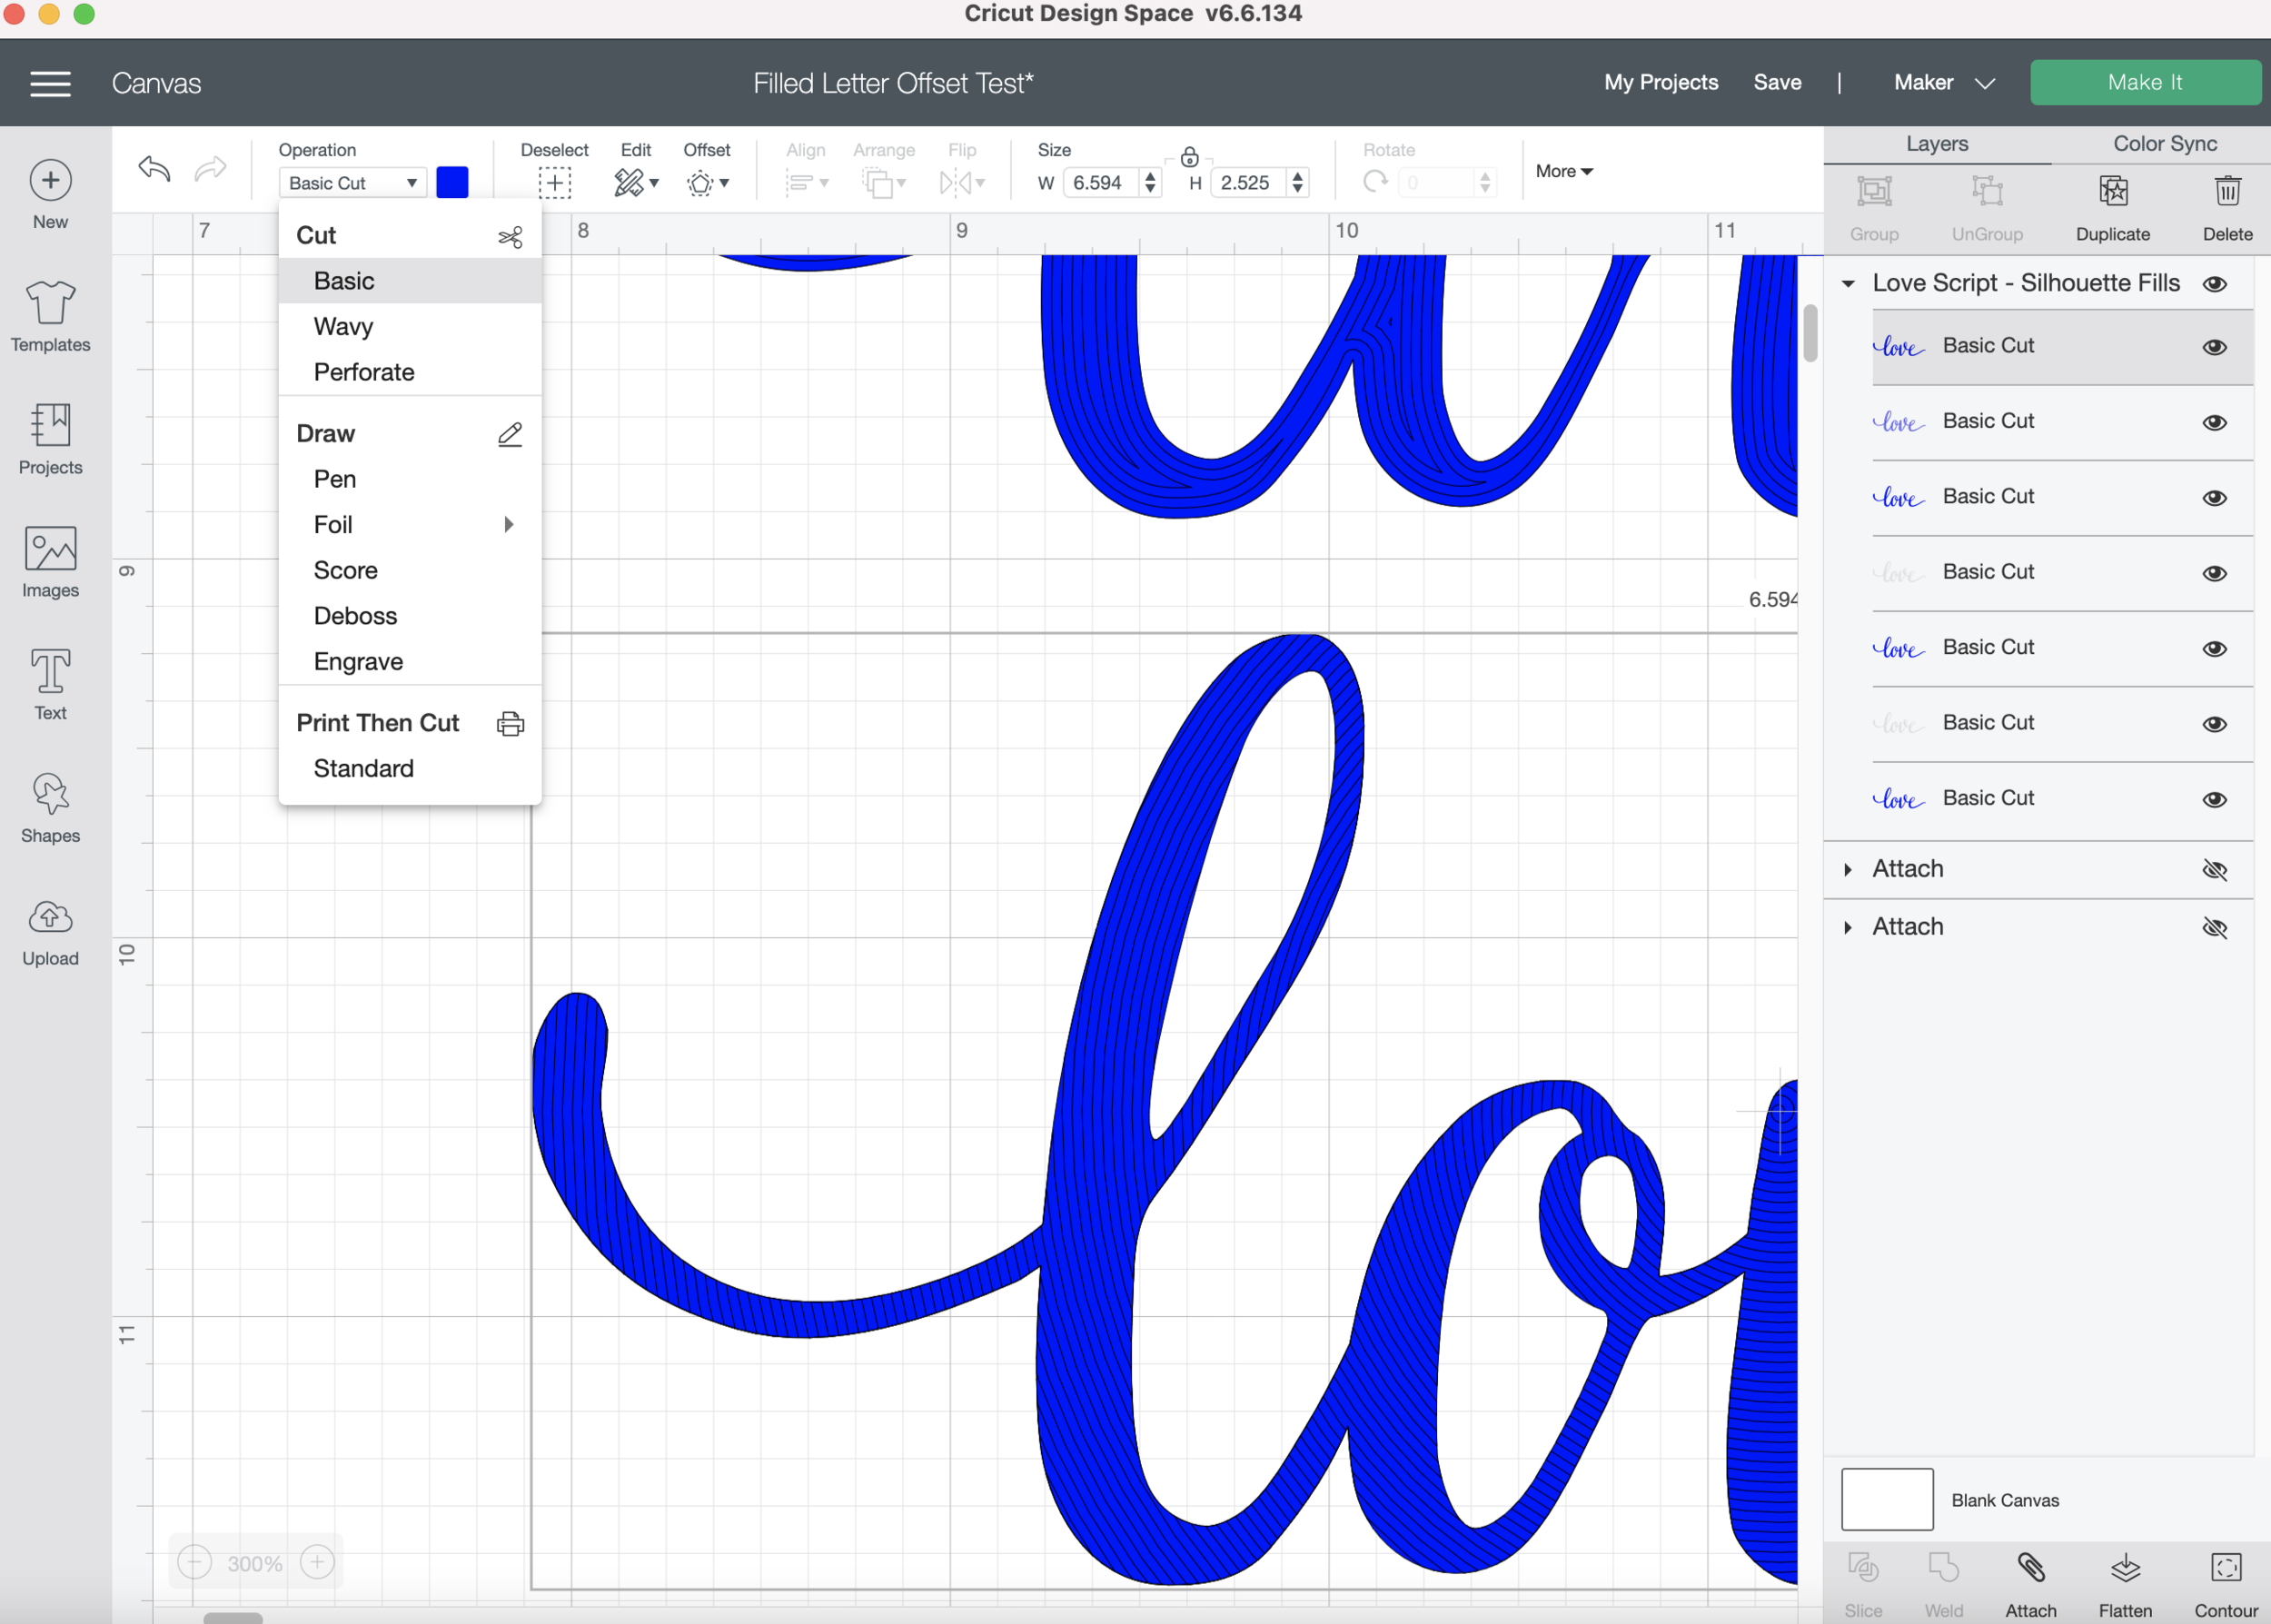
Since I have the Business editon of Silhouette Studio, I can save my file as an SVG so I can import it into Cricut Design Space.

I’m open my SVG in Cricut Design Space. I need to change the linetype to “Draw.” For some reason my SVG is twice the size it was in Silhouette Studio, so I’m going to scale it back down to size.

Filled letters Silhouette Studio in Cricut Design Space

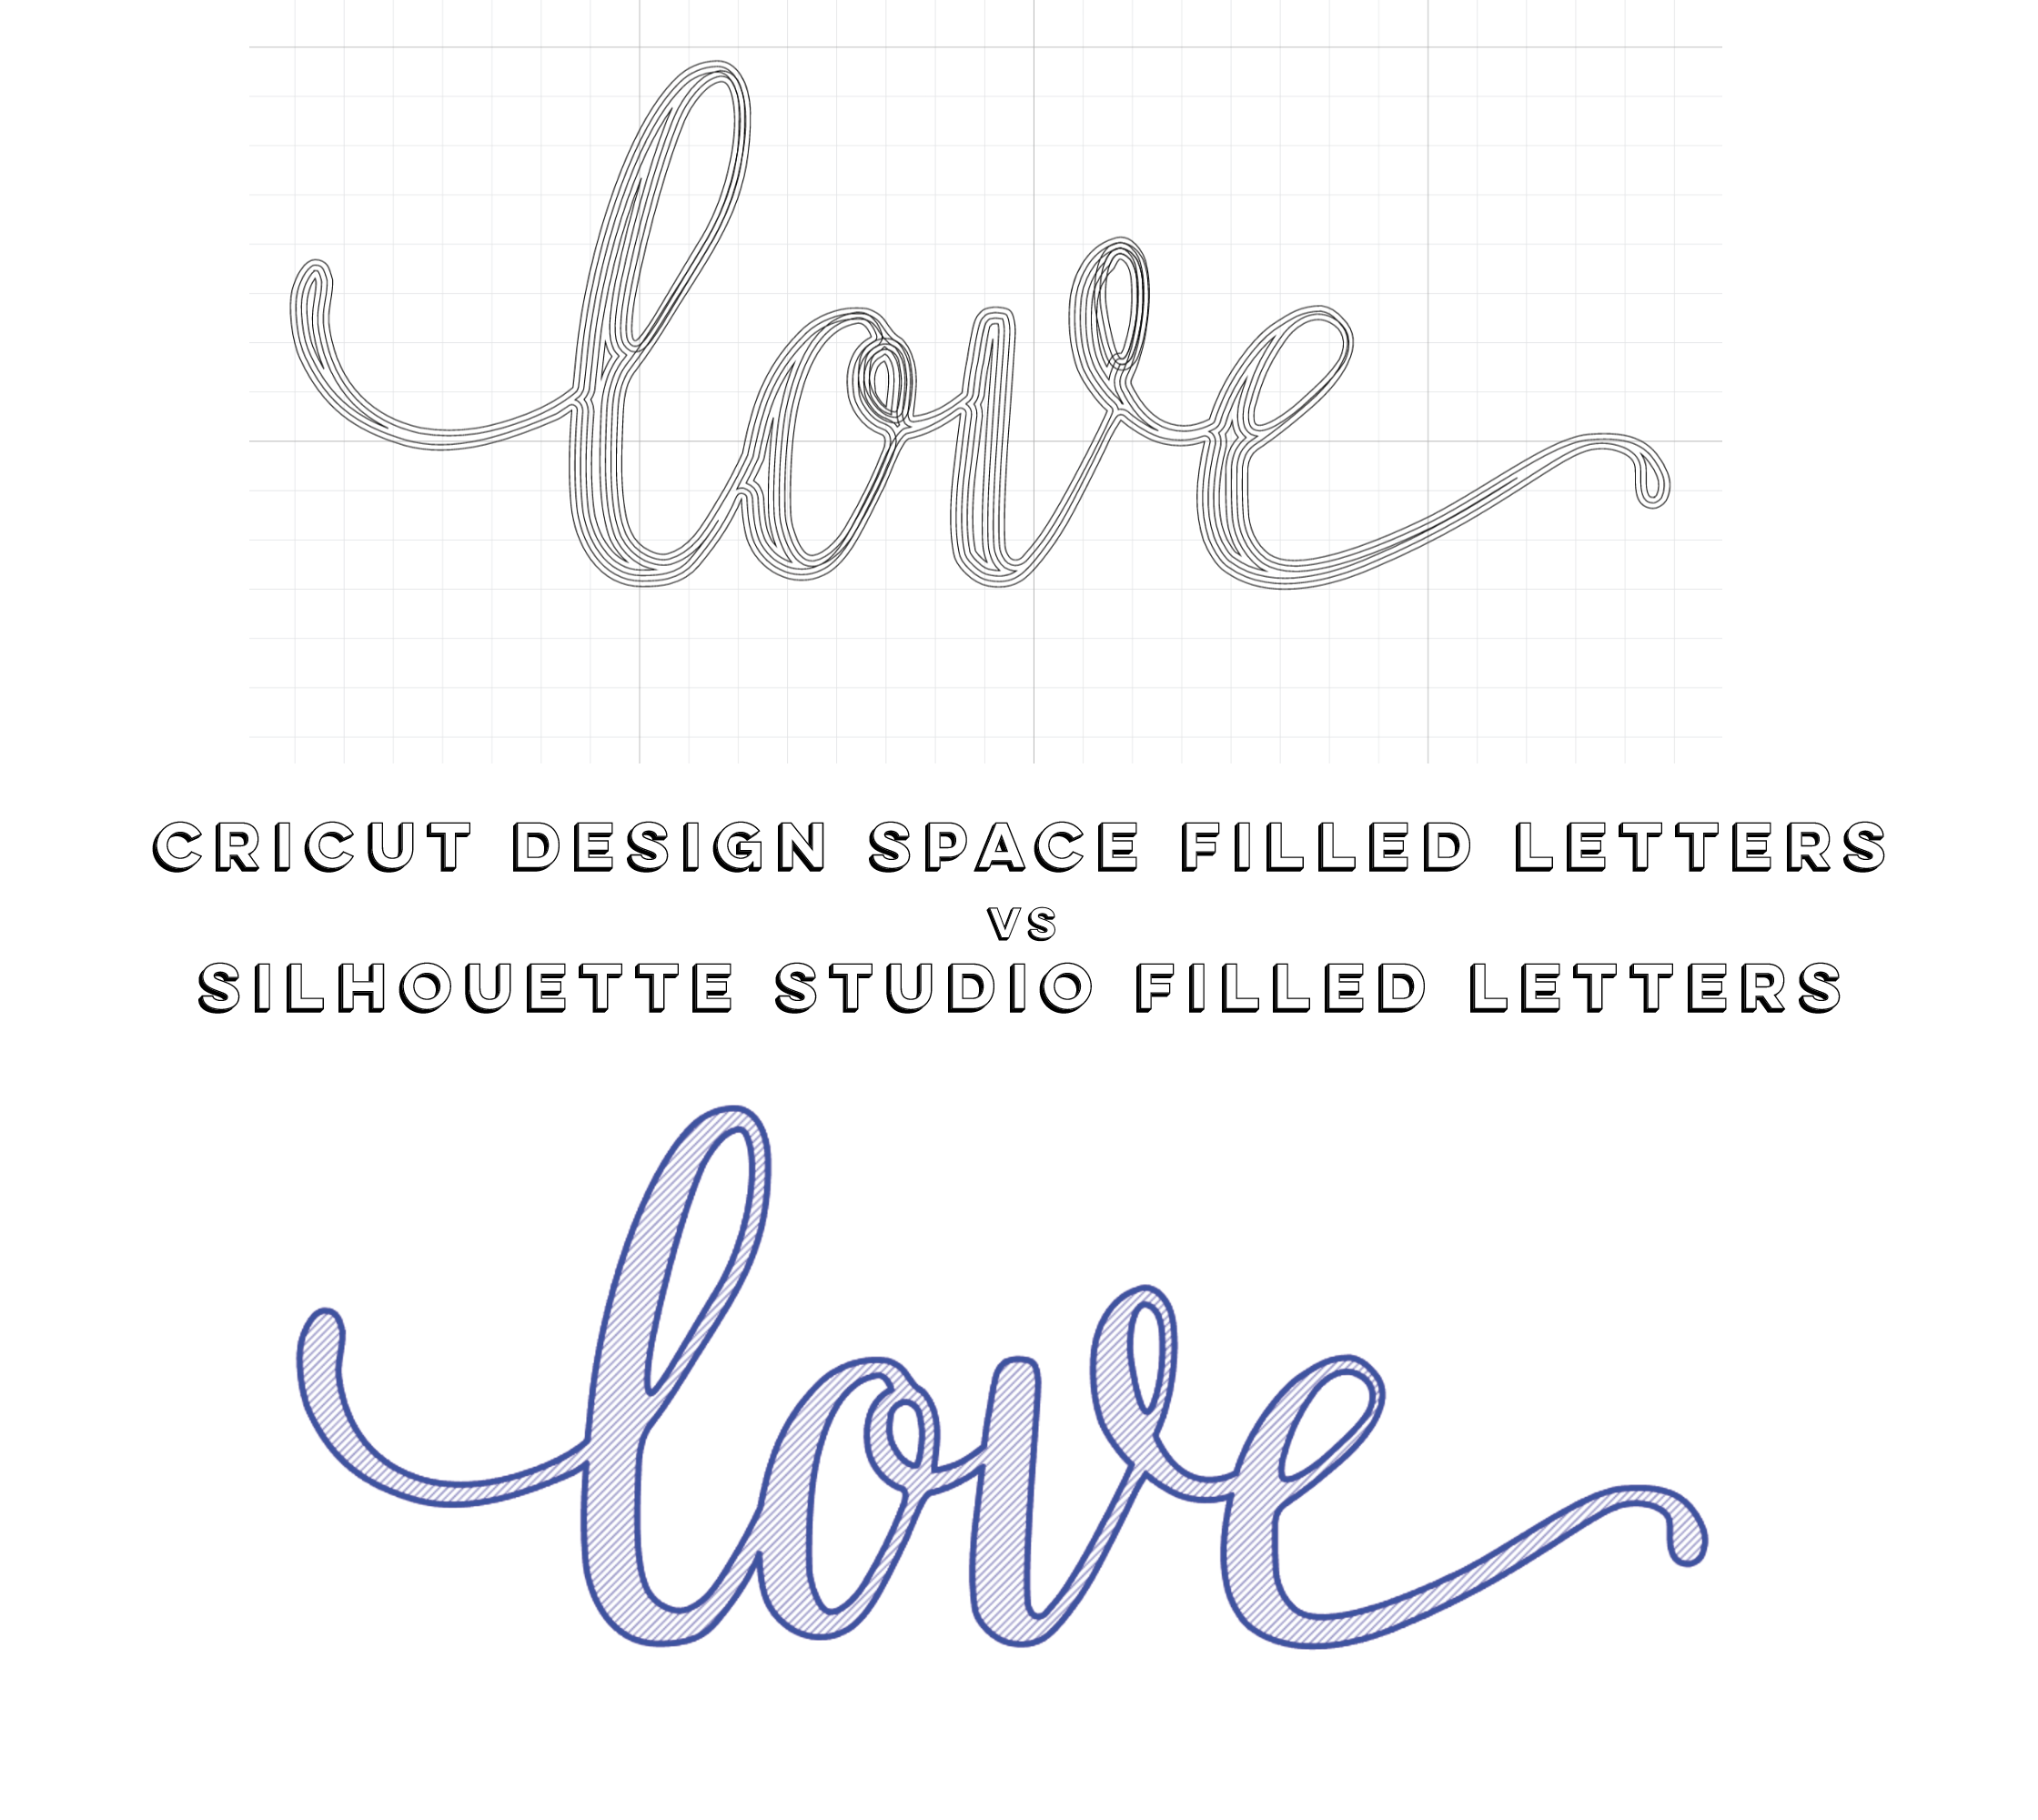
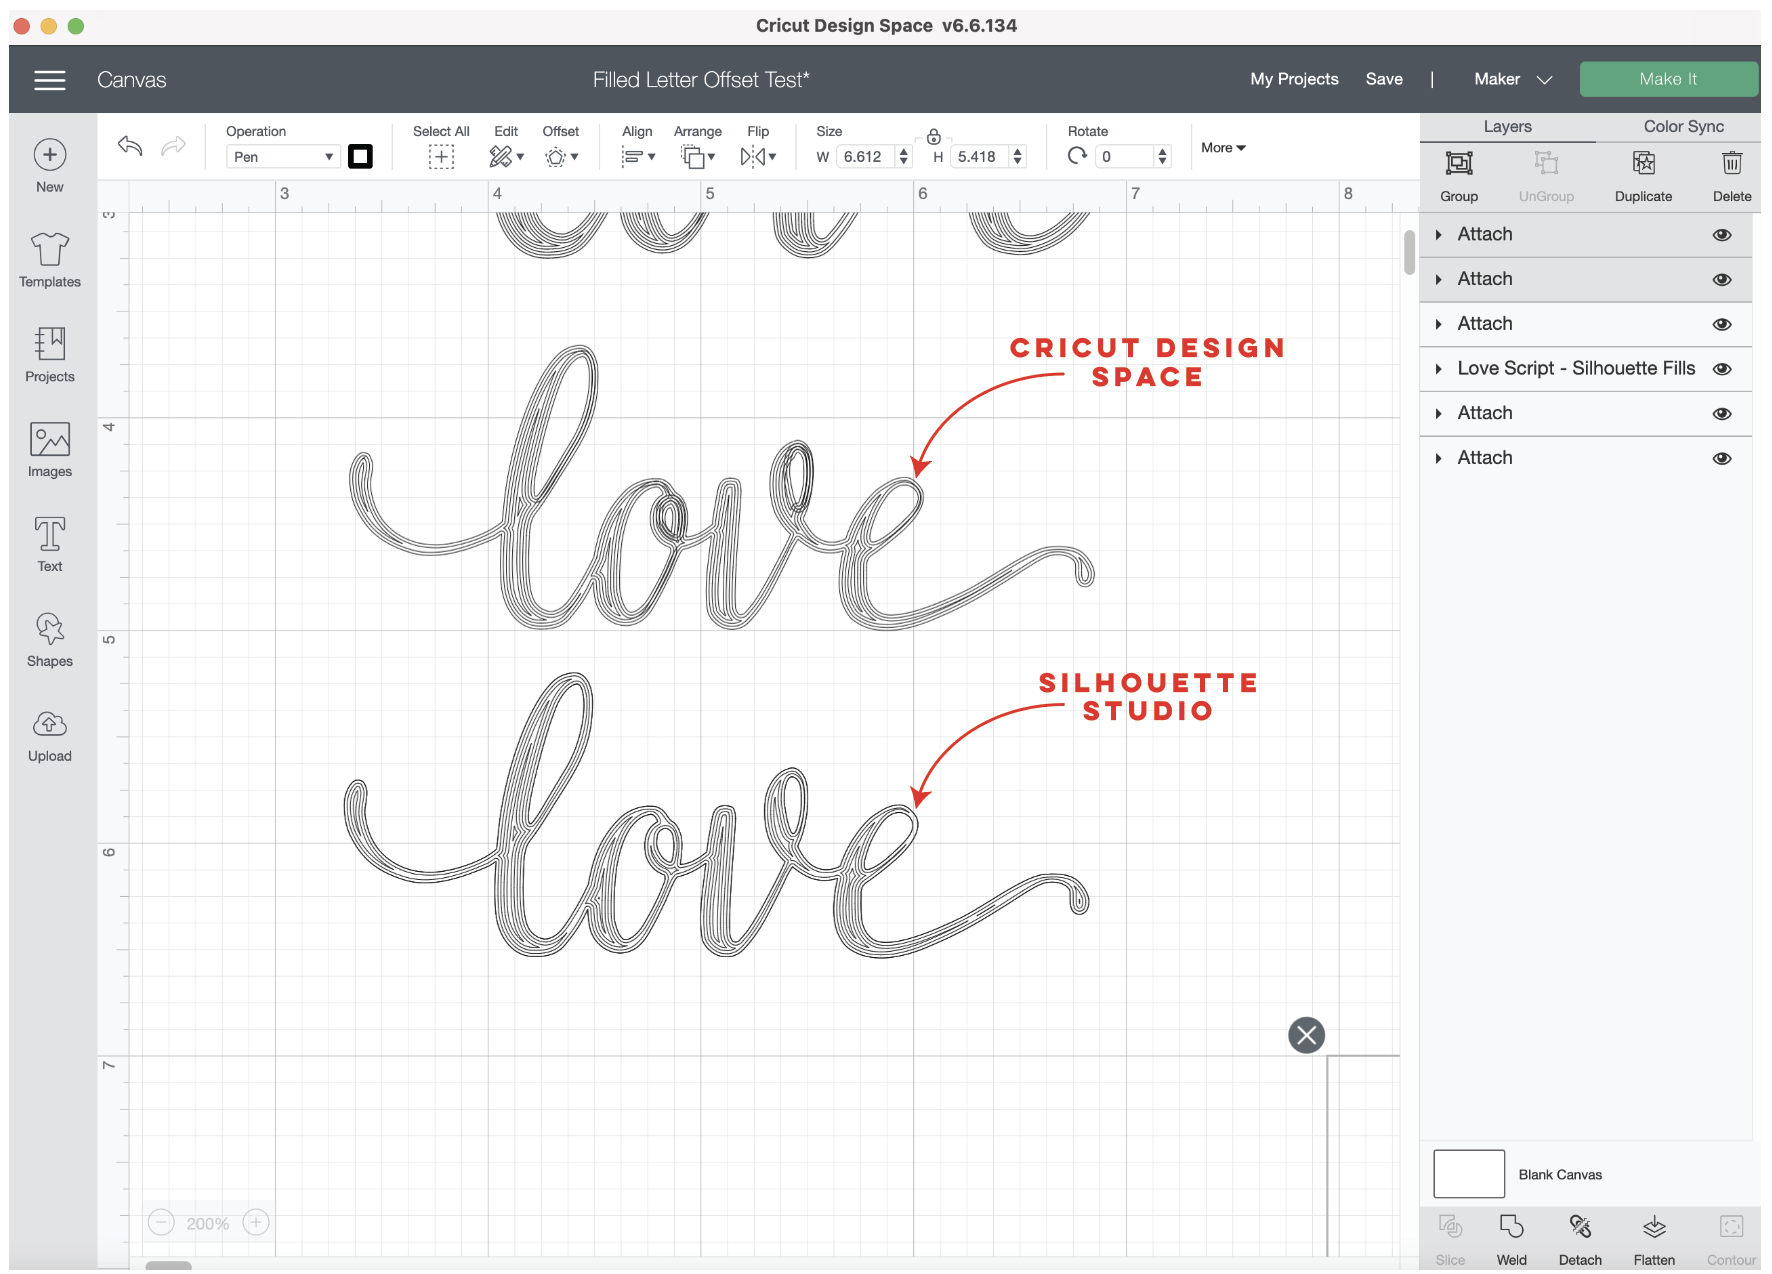
Here’s a comparison of the offset from Design Space and the Concentric circle fill in Silhouette Studio.

Filled letters Silhouette Studio in Cricut Design Space

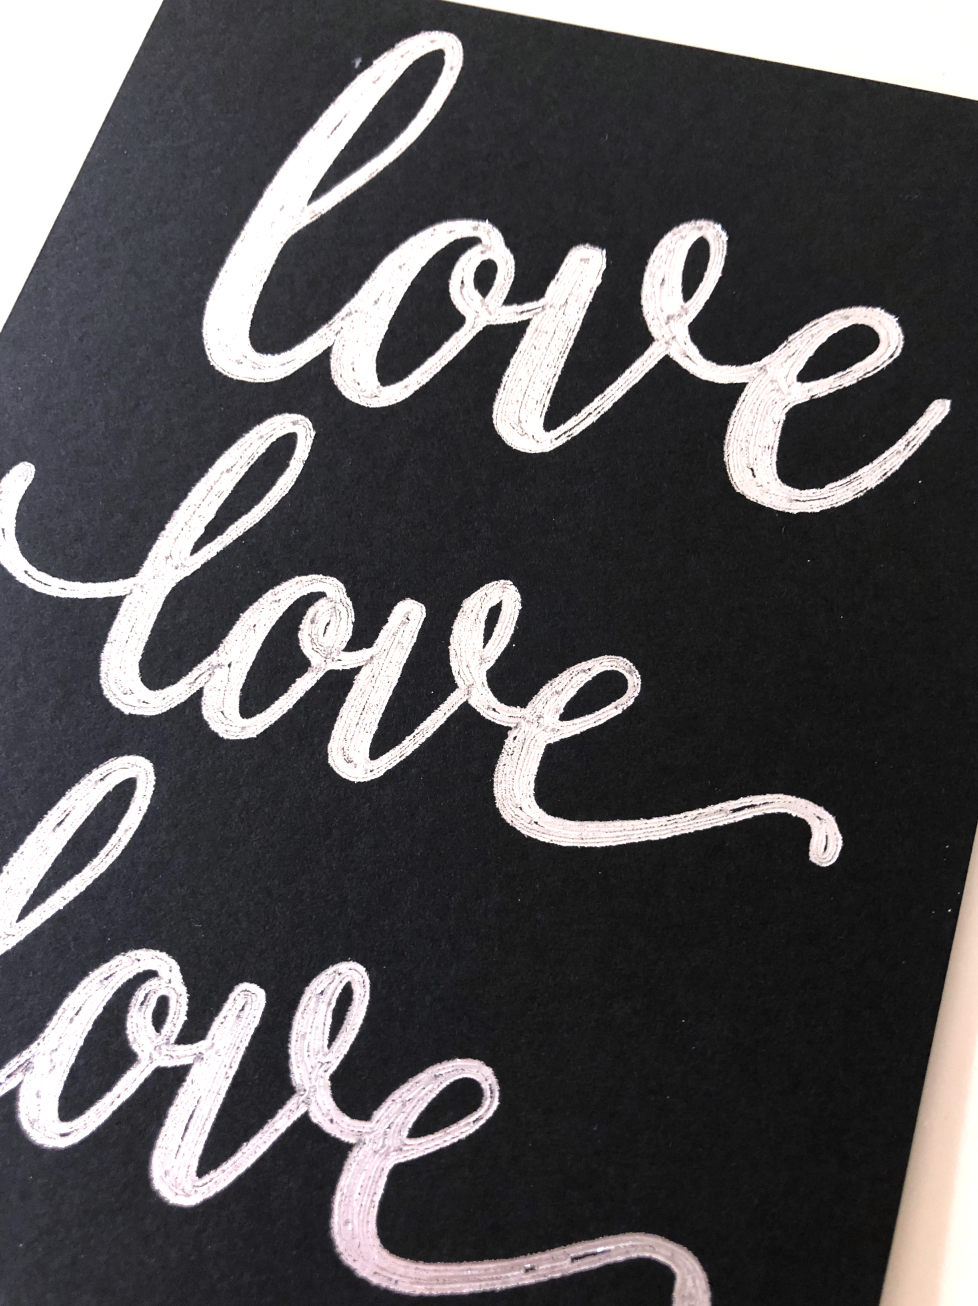
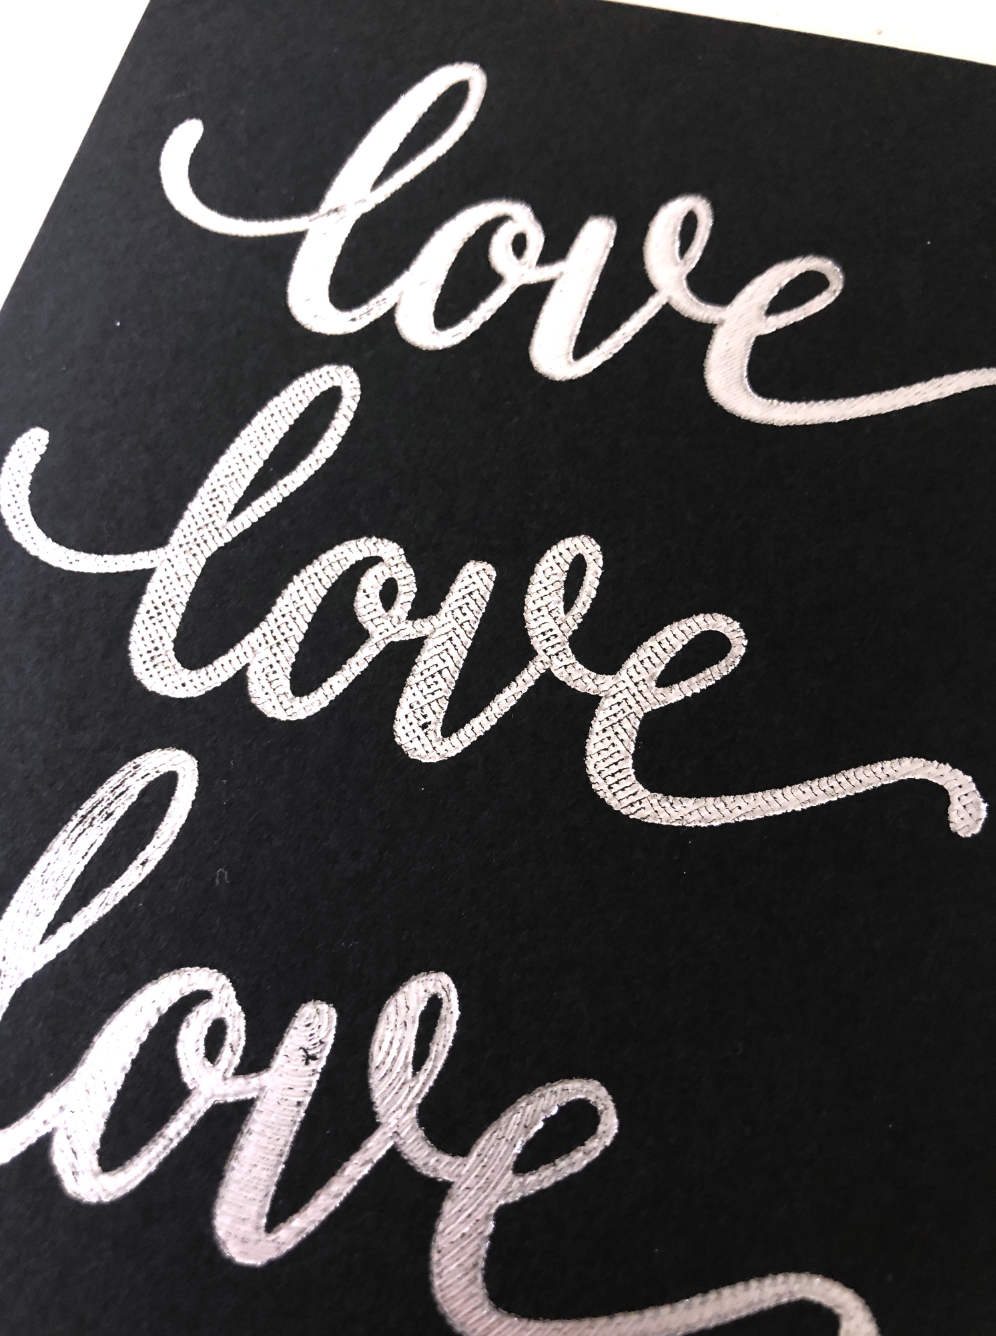
Time to test the different fills! I’m going to use my We R Memory Keepers foil quill, medium tip on cardstock with my Cricut Maker.

Here are the different results, my favorite is still the diagonal line fill at 45 degrees. The crosshatch and spirals both have some interesting textures. The offset is still not my favorite, the lines start to create weird little areas at some of the intersections.

Which fill style is your favorite?

Filled Letters offset method
Filled letters Silhouette Studio
Filled letters offset method
Filled letters Silhouette Studio
Tags: Cricut offset, Cricut Tutorial, Cricut Foil Transfer Tool, Cricut Draw File, Cricut design space, single line SVG, silhouette vs Cricut, Cricut vs silhouette, filled letters silhouette
← How to Clean Your Cricut Mat, the Easy WayCricut Design Space vs Silhouette Studio - Rounded Corners →
Back to Top

Copyright 2023, JoAnna Seiter. Images may not be used without approval. Terms & Conditions