• New Home
  • About
  • Contact
  • Tips & Tutorials
  • Portfolio
  • Digital Downloads
  • SHOP
  • featured in
  • INSTAGRAM
Menu

JoAnna Seiter

  • New Home
  • About
  • Contact
  • Tips & Tutorials
  • Portfolio
  • Digital Downloads
  • SHOP
  • featured in
  • INSTAGRAM
1-JoAnna-Seiter_Square.jpg

JoAnna’s Tips & Tutorials

Hi, I’m JoAnna, thanks for stopping by! I love creating textile and surface pattern designs, sewing, and painting. I’m always learning new things and want to share some of that info with you. I hope to bring you a helpful tutorial or a quick little tip each week.


Latest Posts:

Featured
Cameo 4 Foil Quill Alternative
Jun 7, 2022
Cameo 4 Foil Quill Alternative
Jun 7, 2022
Jun 7, 2022
Silhouette Cameo 4 Fine Tip Foil Quill Adapter
May 31, 2022
Silhouette Cameo 4 Fine Tip Foil Quill Adapter
May 31, 2022
May 31, 2022
Shrink Plastic Pins with the Cricut Maker
Mar 15, 2022
Shrink Plastic Pins with the Cricut Maker
Mar 15, 2022
Mar 15, 2022
Making Pins using Black Shrink Plastic and the Foil Quill
Mar 8, 2022
Making Pins using Black Shrink Plastic and the Foil Quill
Mar 8, 2022
Mar 8, 2022
Another Style of Watercolor Clipart in Procreate
Mar 1, 2022
Another Style of Watercolor Clipart in Procreate
Mar 1, 2022
Mar 1, 2022
Creating Watercolor Style Clip Art in Procreate to Use With Your Cricut or Silhouette Machine
Feb 22, 2022
Creating Watercolor Style Clip Art in Procreate to Use With Your Cricut or Silhouette Machine
Feb 22, 2022
Feb 22, 2022
Creating Gouache Style Clip Art in Procreate to Use With Your Cricut or Silhouette Machine
Feb 15, 2022
Creating Gouache Style Clip Art in Procreate to Use With Your Cricut or Silhouette Machine
Feb 15, 2022
Feb 15, 2022
Creating a Single Line SVG File in the Adobe Illustrator App Using Vectorize
Feb 8, 2022
Creating a Single Line SVG File in the Adobe Illustrator App Using Vectorize
Feb 8, 2022
Feb 8, 2022
Creating Your Own Single Line SVG File - Part Three
Feb 1, 2022
Creating Your Own Single Line SVG File - Part Three
Feb 1, 2022
Feb 1, 2022
Creating Your Own Single Line SVG Files - Part Two
Jan 25, 2022
Creating Your Own Single Line SVG Files - Part Two
Jan 25, 2022
Jan 25, 2022
Creating Your Own Single Line SVG Files - Part One
Jan 18, 2022
Creating Your Own Single Line SVG Files - Part One
Jan 18, 2022
Jan 18, 2022
Low Poly Heart Box
Jan 11, 2022
Low Poly Heart Box
Jan 11, 2022
Jan 11, 2022
Planner Stickers with the WRMK Foil Quill
Jan 4, 2022
Planner Stickers with the WRMK Foil Quill
Jan 4, 2022
Jan 4, 2022
3D Cardstock Snowflakes
Dec 28, 2021
3D Cardstock Snowflakes
Dec 28, 2021
Dec 28, 2021
Portrait 3 Print and Cut Gift Labels
Dec 21, 2021
Portrait 3 Print and Cut Gift Labels
Dec 21, 2021
Dec 21, 2021
DIY Gift Card Envelopes
Dec 14, 2021
DIY Gift Card Envelopes
Dec 14, 2021
Dec 14, 2021
Blade Replacement Alternatives for Portrait 3
Dec 7, 2021
Blade Replacement Alternatives for Portrait 3
Dec 7, 2021
Dec 7, 2021
12 Gift Ideas for Someone Who Owns a Cricut or Silhouette Machine
Nov 30, 2021
12 Gift Ideas for Someone Who Owns a Cricut or Silhouette Machine
Nov 30, 2021
Nov 30, 2021
Foiling on Acrylic with Cricut and WRMK Foil Quill
Nov 23, 2021
Foiling on Acrylic with Cricut and WRMK Foil Quill
Nov 23, 2021
Nov 23, 2021
How to Set Up Your Template on Your Cutting Mat for Silhouette Users
Nov 16, 2021
How to Set Up Your Template on Your Cutting Mat for Silhouette Users
Nov 16, 2021
Nov 16, 2021
Etching on Acrylic with the Silhouette Portrait 3
Nov 9, 2021
Etching on Acrylic with the Silhouette Portrait 3
Nov 9, 2021
Nov 9, 2021
Foil Quill on Acrylic with the Portrait 3
Nov 2, 2021
Foil Quill on Acrylic with the Portrait 3
Nov 2, 2021
Nov 2, 2021
Scoring with the Portrait 3 Using the Cricut Scoring Stylus
Oct 26, 2021
Scoring with the Portrait 3 Using the Cricut Scoring Stylus
Oct 26, 2021
Oct 26, 2021
Silhouette Portrait 3 Scoring with the Bevel Quill
Oct 19, 2021
Silhouette Portrait 3 Scoring with the Bevel Quill
Oct 19, 2021
Oct 19, 2021
Tips for Using the WRMK Fine Tip Foil Quill with the Silhouette Portrait 3
Oct 12, 2021
Tips for Using the WRMK Fine Tip Foil Quill with the Silhouette Portrait 3
Oct 12, 2021
Oct 12, 2021
Using the Trace Tool in Silhouette Studio
Oct 5, 2021
Using the Trace Tool in Silhouette Studio
Oct 5, 2021
Oct 5, 2021
Using the Silhouette Portrait 3 Pixscan Mat to Cut Stickers
Sep 28, 2021
Using the Silhouette Portrait 3 Pixscan Mat to Cut Stickers
Sep 28, 2021
Sep 28, 2021
Cricut Snap Mat Feature to Cut Stickers
Sep 21, 2021
Cricut Snap Mat Feature to Cut Stickers
Sep 21, 2021
Sep 21, 2021
Cutting Full Sticker Sheets with Your Cricut - Part 3 - Final Cutting
Sep 14, 2021
Cutting Full Sticker Sheets with Your Cricut - Part 3 - Final Cutting
Sep 14, 2021
Sep 14, 2021
Cutting Full Sticker Sheets with Your Cricut - Part 2 - Test Printing
Sep 7, 2021
Cutting Full Sticker Sheets with Your Cricut - Part 2 - Test Printing
Sep 7, 2021
Sep 7, 2021

Digital Downloads

Featured
Floral Easter Egg Single Line SVG Files
$2.00
Carnation Flower Single Line SVG File, Botanical Floral Clip Art, Instant Digital Download
$3.00
Daffodils_Main Page-01.jpg
Daffodil Flower Single Line SVG Files
$3.00
Lilies_Main Page-01.jpg
Lily Single Line SVG Files
$2.00
3D Low Poly Heart Box SVG File
$2.00
Month, Day, Numbers Single Line SVG files
$2.00
Celestial_Main Page-01.jpg
Celestial Theme Single Line SVG Files
$5.00
Good Luck Charm Single Line SVG Files
$5.00
Floral Skull Single Line SVG Files
$3.00
Snowflake Single Line SVG Clip Art Files
$5.00
Screen Shot 2021-02-07 at 9.58.28 PM.png

Kiss Cut Stickers on My Cricut Maker

February 09, 2021 in Cricut, Tutorial

Hello again! This week I’m going to to share the materials and settings I use to make my kiss cut stickers with my Cricut Maker.

Note: I’m cutting full 8.5 x11 sheets of sticker paper. I’m NOT using Cricut’s Print then Cut setting.

If you want me to go more in depth into any of the steps, let me know in the comments below!

Let’s get started!

Supplies: (Links below may be affiliate links)

  • Color Inkjet or laser printer

  • Cricut Maker

  • Fine Point Blade

  • Light Grip Mat (the blue one)

  • Printable Sticker Paper (I’m using this one from Online Labels)

  • Artwork for your stickers (I’m using my Valentine’s Day Clip Art)

I resized and laid out some of the elements from my clip art onto an 8.5 x 11 art board in Adobe Illustrator. (I originally drew my clip art in Procreate on my iPad and brought it into Photoshop to clean it up and make individual PNGs.)

Screen Shot 2021-02-06 at 3.49.46 PM.png

I create a new layer below the sticker artwork. Then I used the Blob Brush (Shift + B) In Illustrator to make my cut lines around my stickers. (There are many other ways to do this, you may have a different method that you prefer).

I made my cut lines with a bright blue fill so they’re easier to see, you can make them any color you like.

Screen Shot 2021-02-06 at 4.03.18 PM.png

I used the pen tool (P) to make registration marks in the 4 corners of the art board.

Screen Shot 2021-02-06 at 4.54.43 PM.png

Save the file as and AI (Illustrator) file.

Then delete the actual sticker images so you only have the cut lines and registration marks. Save that as an SVG file (you will be uploading this to Design Space).

Screen Shot 2021-02-06 at 4.58.22 PM.png

Re-open the AI file, and hide the layer with the cut lines and registration marks.

Screen Shot 2021-02-06 at 5.02.09 PM.png

Now lets print our sticker artwork! Make sure your are printing your artwork at 100% scale, DO NOT select fit to page.

Screen Shot 2021-02-06 at 5.02.41 PM.png

My printer takes forever, so while it’s printing I’m going to set up my cut file in Design Space. Upload the SVG the you saved of just the cutlines & registration marks. Select INSERT IMAGE.

Screen Shot 2021-02-06 at 5.13.18 PM.png

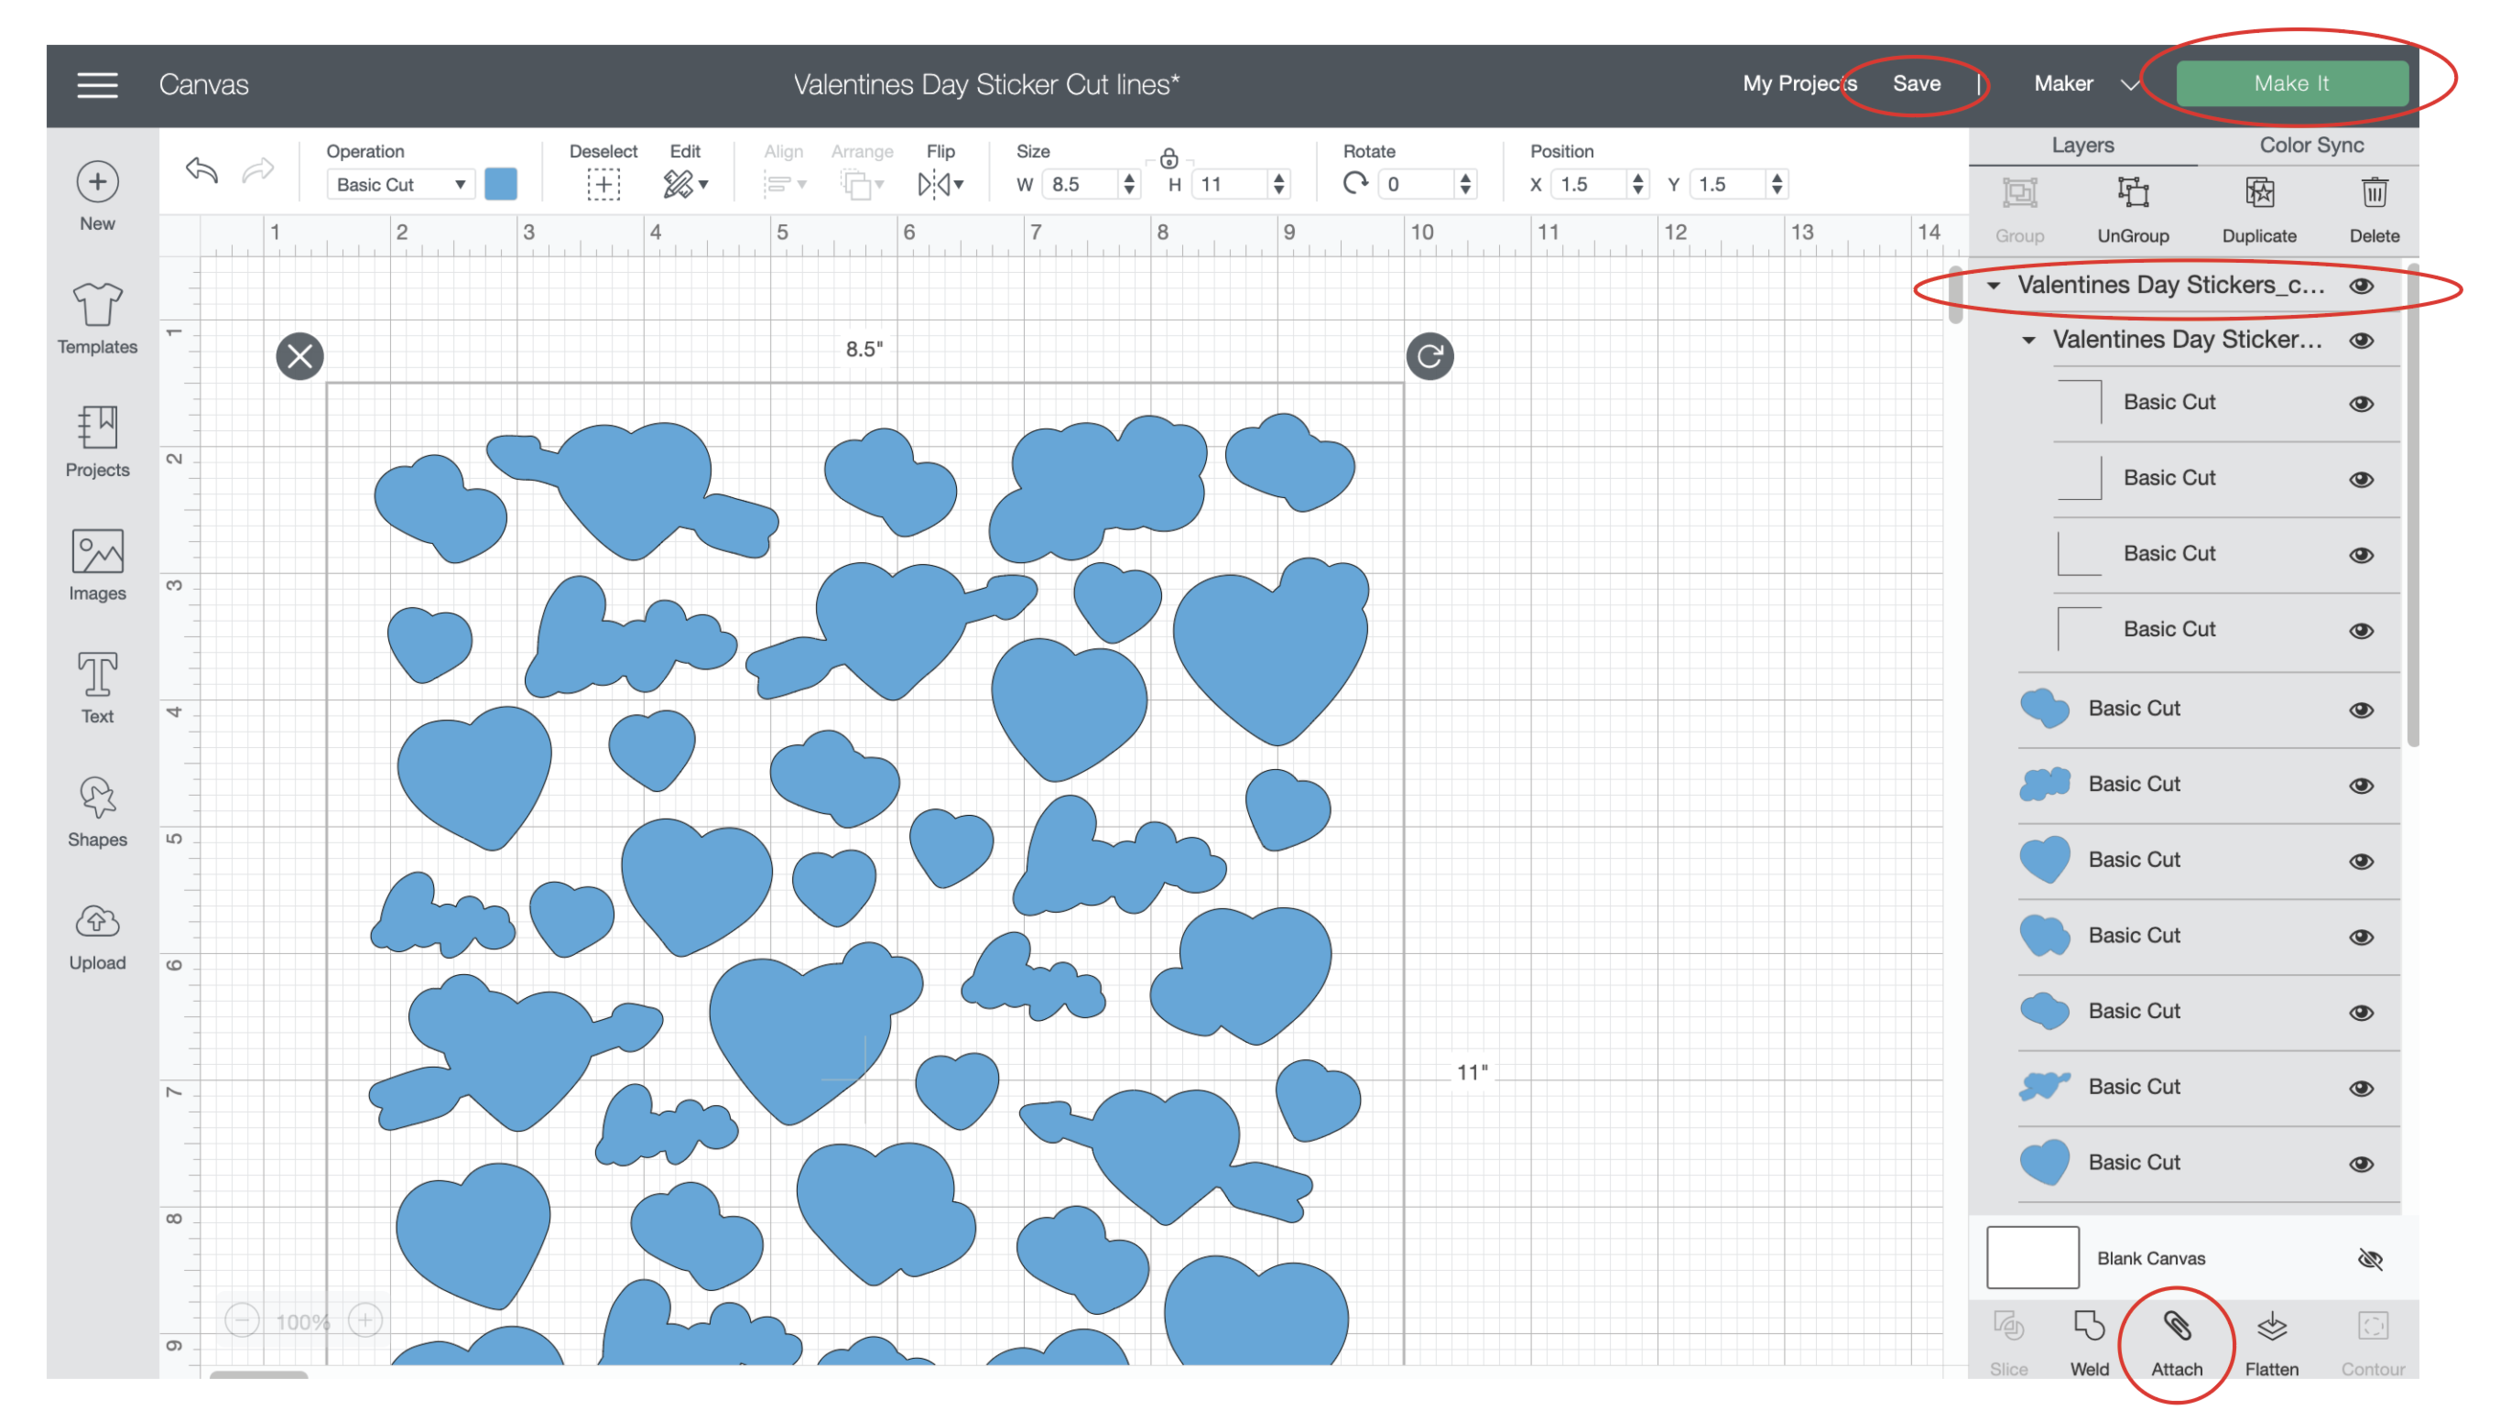
Select the top layer so everything in the cut file is selected - cut lines & registration marks. Check the size of your artwork and make sure it’s 8.5 x 11.

Screen Shot 2021-02-06 at 5.19.02 PM.png

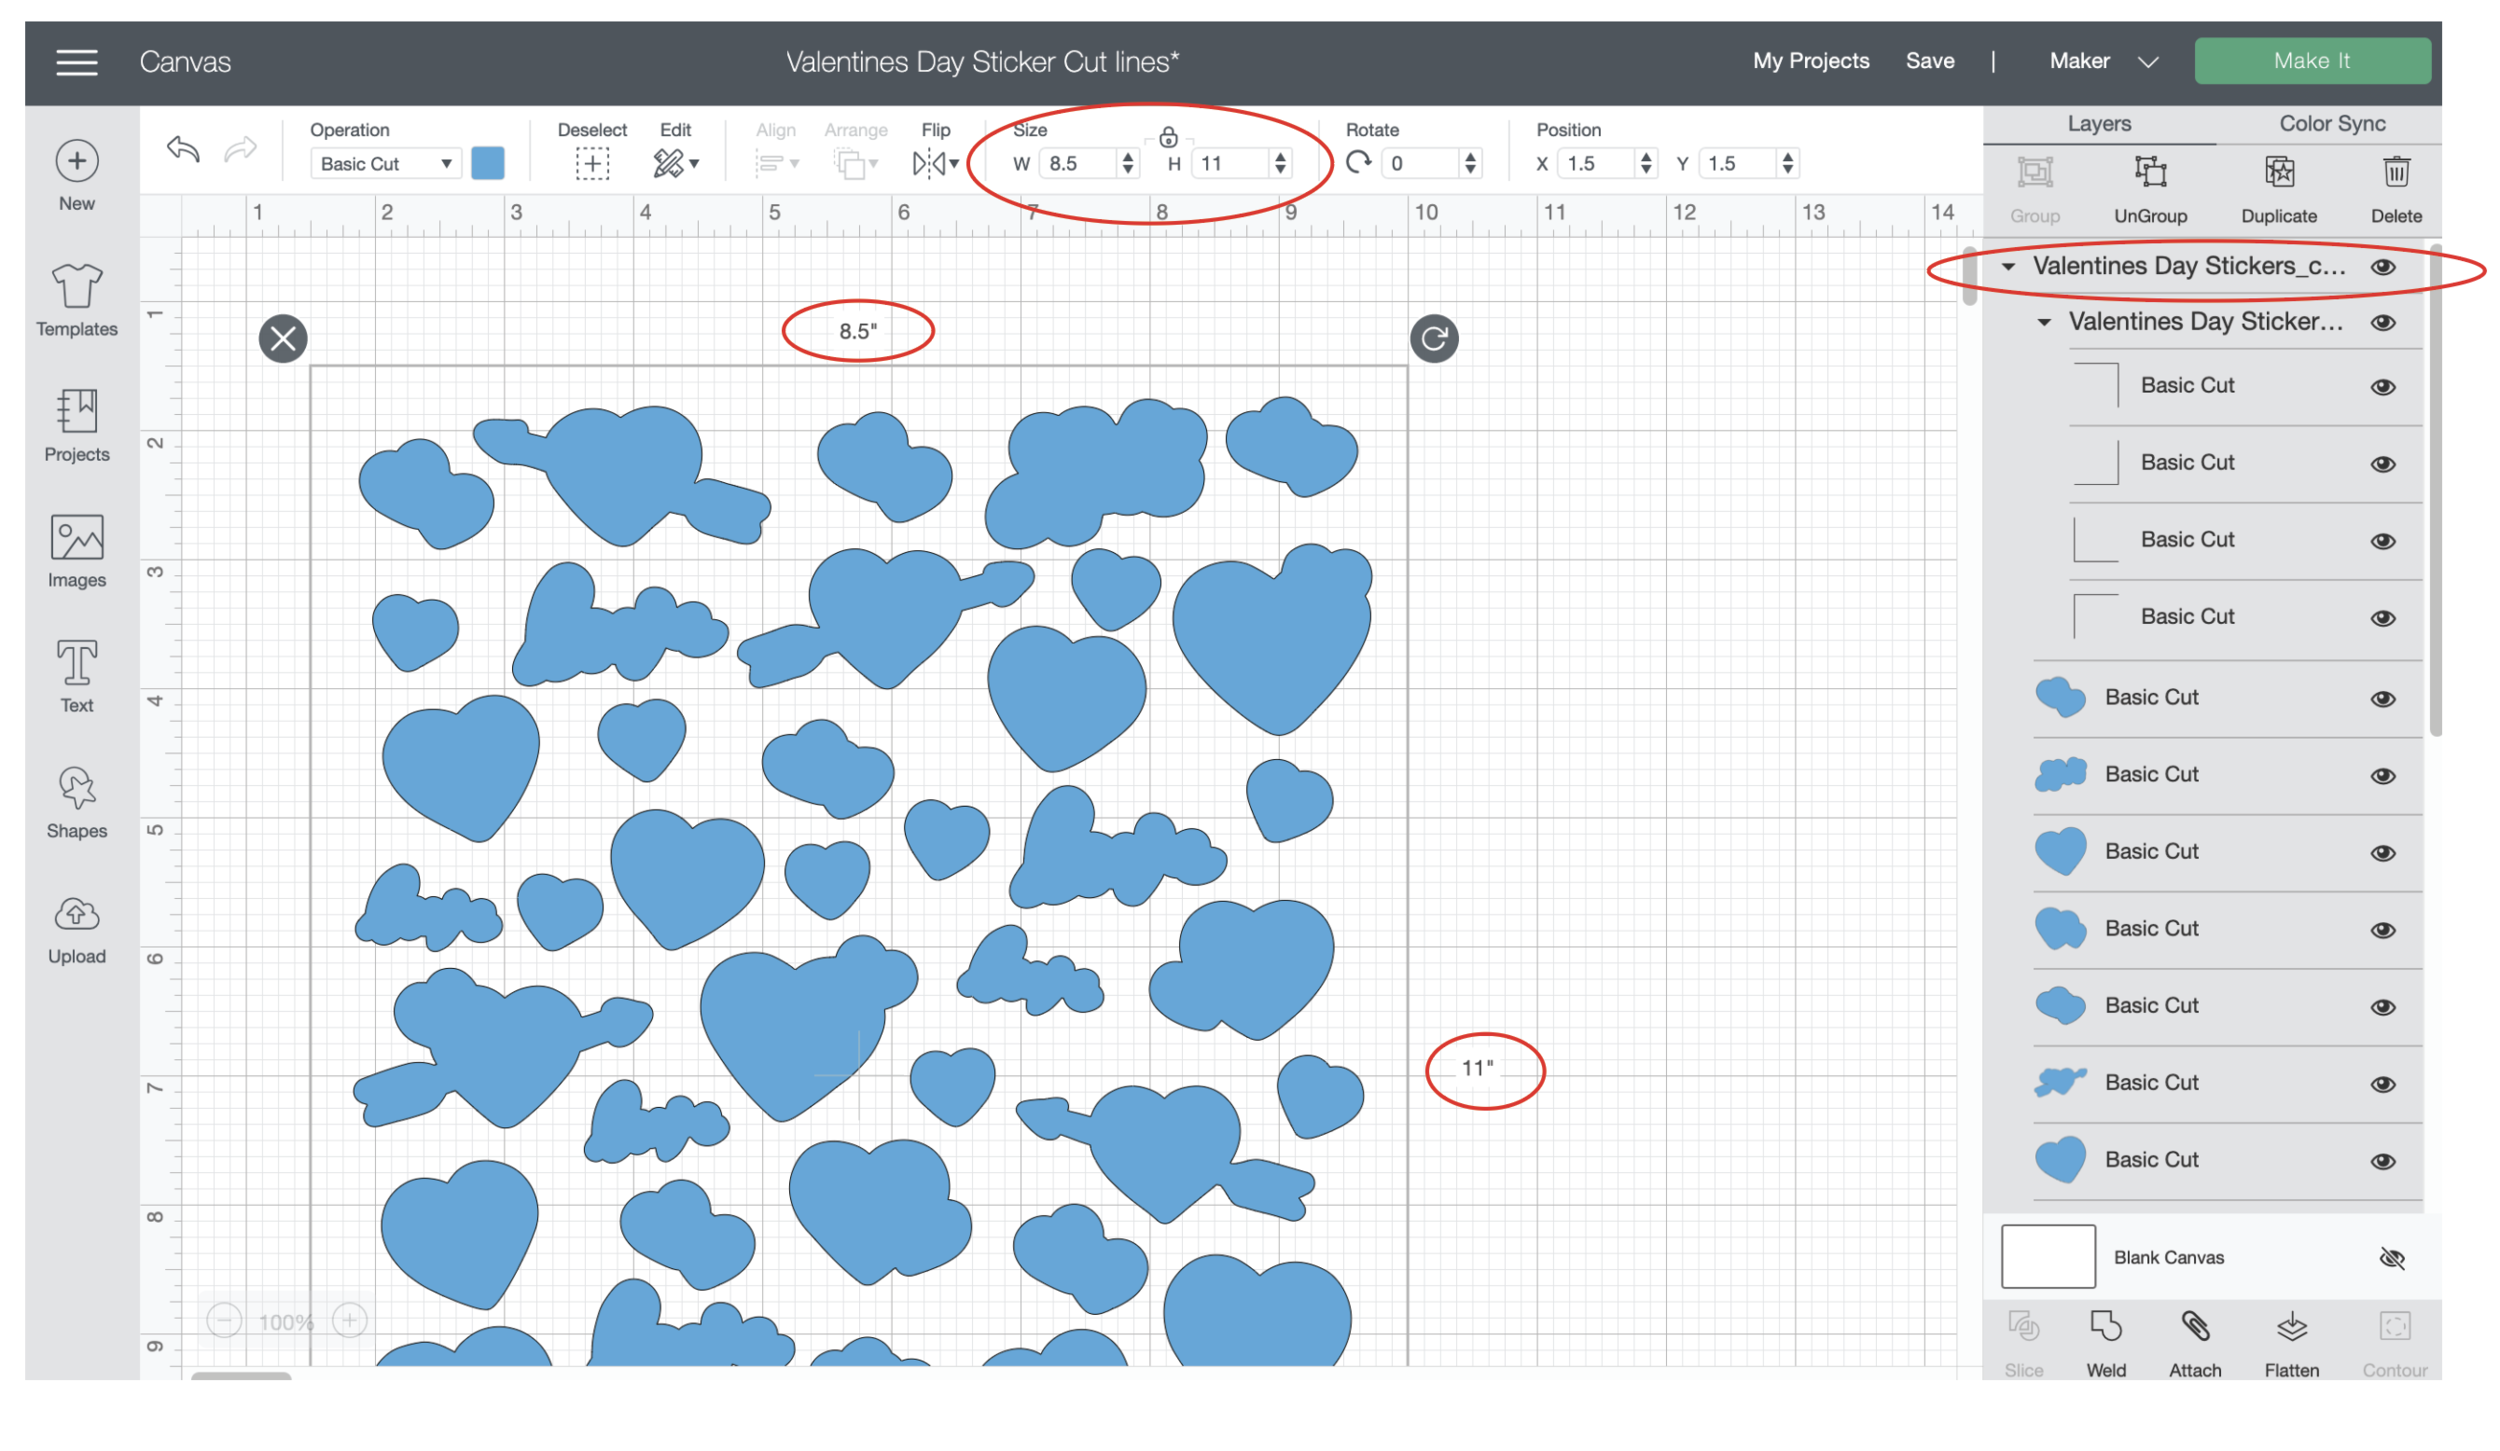
Everything is 8.5 x 11 so with all the layers still selected, I’m going to click ATTACH then SAVE then MAKE IT.

Screen Shot 2021-02-06 at 5.23.06 PM.png

I want the top left corner registration mark as far to the left and top of the mat as Design Space will allow me to go.

Screen Shot 2021-02-06 at 5.29.45 PM.png

I’ve already done some alignment tests with my machine. (If you would like to see a post about my alignment process, leave a note in the comments section below). I’m going to place my printed sticker paper on my mat, right up against the white paper border I have in the corner.

The paper border in the corner represents the area of the mat that the machine will not cut, it’s the same as the area in Design Space where I cannot move my artwork beyond.

Then I’m going to press CONTINUE in Design Space.

Screen Shot 2021-02-07 at 9.46.27 PM.png

For my material I’m going to select WASHI SHEET. So far, this is the best setting I have found for this particular paper and making kiss cut stickers.

Screen Shot 2021-02-04 at 4.57.11 PM.png

(I was going to make a post on how to make your own custom material setting in Design Space, but it’s very glitchy. I’ve reported it and I’m waiting to hear back from the Cricut Team)

Load my Fine Point blade, load my mat into my machine and press GO!

Once it’s done cutting, unload your mat and CAREFULLY remove the sticker sheet from the mat.

Screen Shot 2021-02-07 at 10.04.07 PM.png

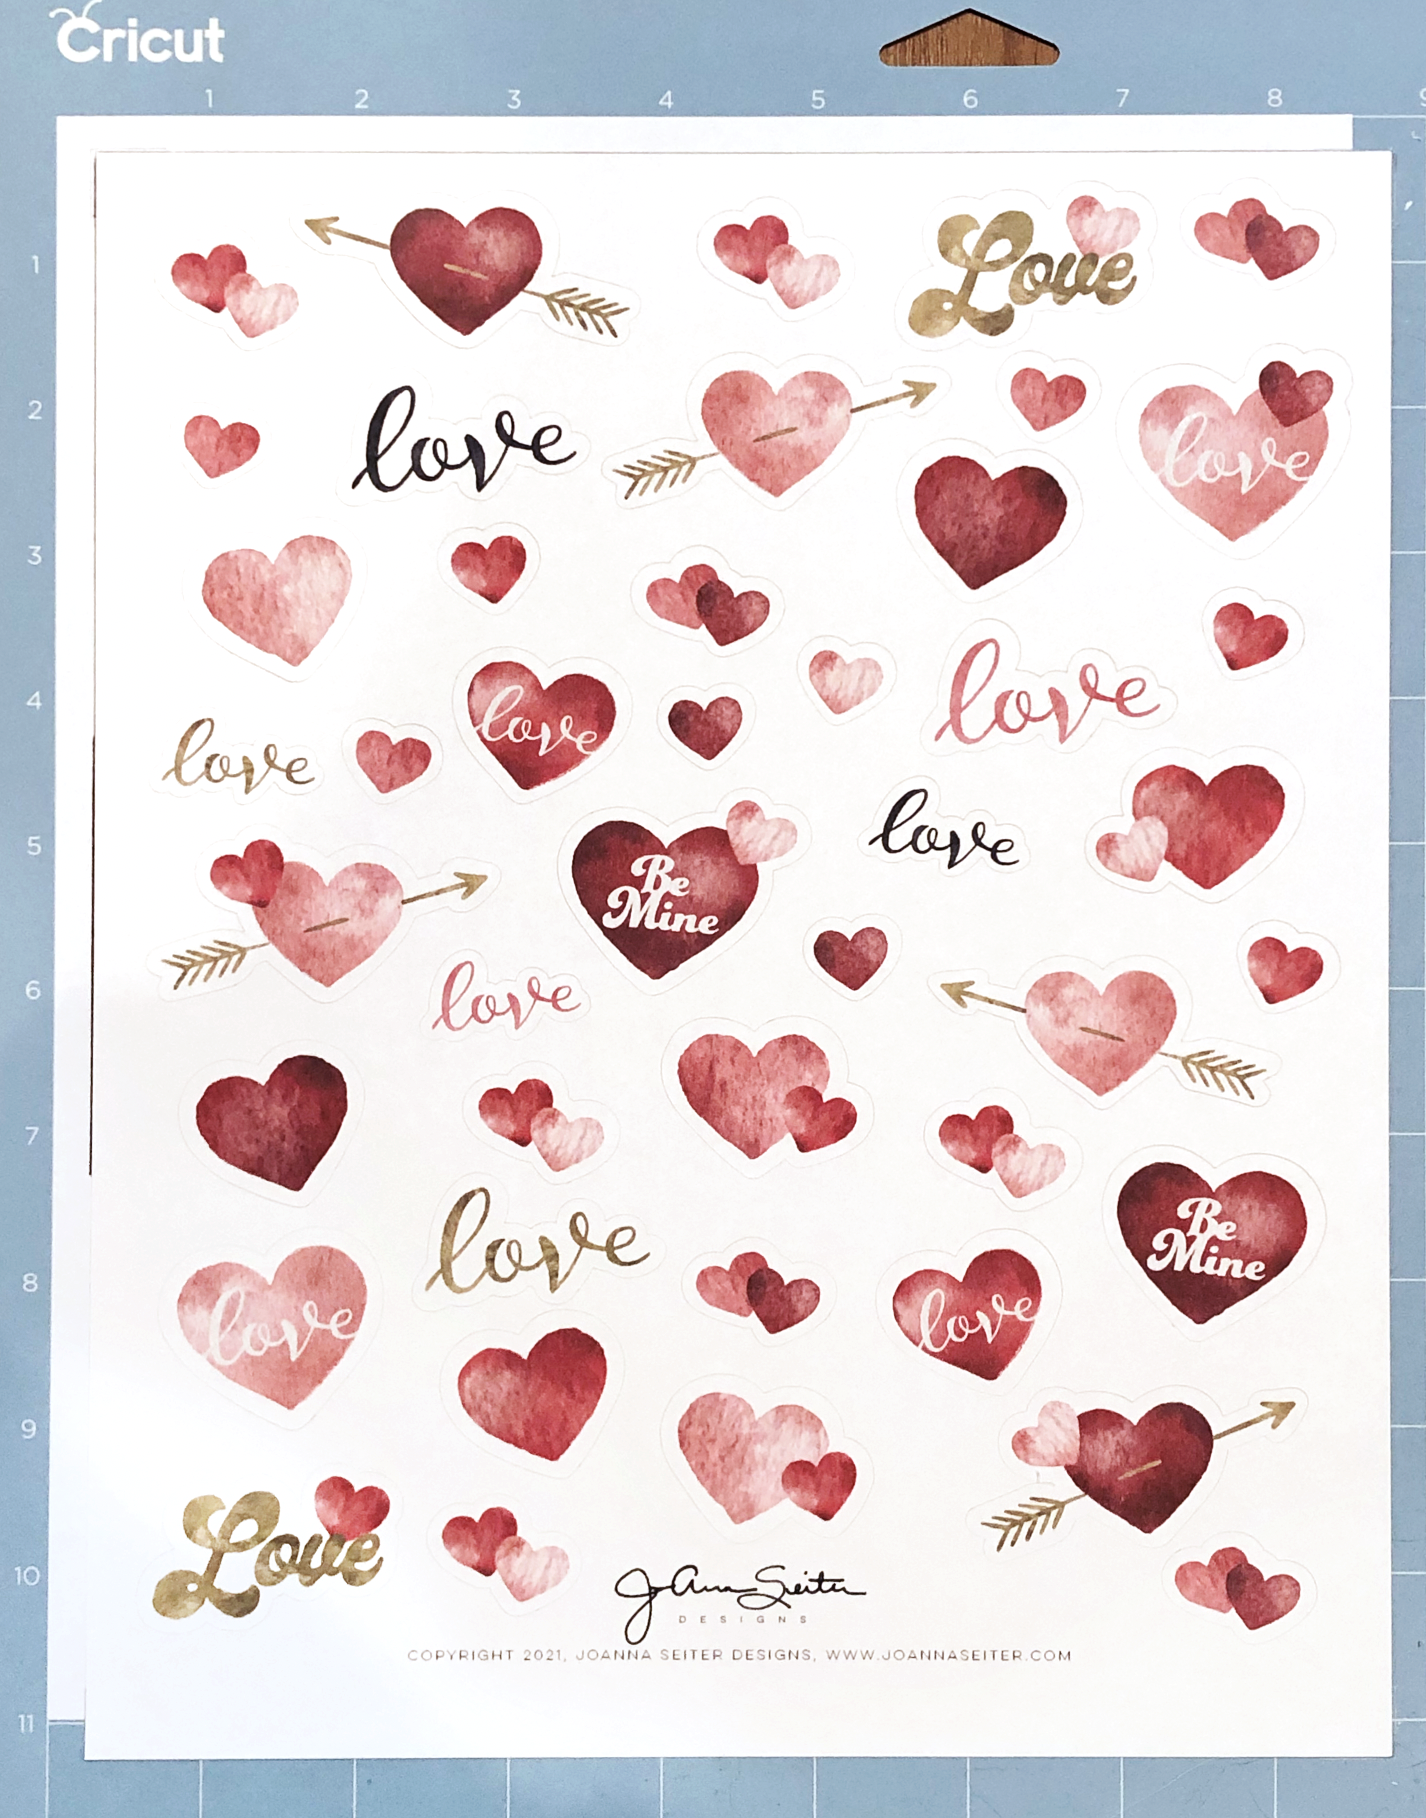
Now you have a sheet of cute custom stickers!

Screen Shot 2021-02-07 at 9.58.28 PM.png
Tags: DIY stickers, printable stickers, kiss cut stickers, Cricut Maker, Cricut Tutorial, Valentines Day, Valentines Day stickers
← Creating an Offset for Stickers in Adobe Illustrator - Method 1FREE Template DIY Cricut Tool & Blade Organizer →
Back to Top

Copyright 2023, JoAnna Seiter. Images may not be used without approval. Terms & Conditions