• New Home
  • About
  • Contact
  • Tips & Tutorials
  • Portfolio
  • Digital Downloads
  • SHOP
  • featured in
  • INSTAGRAM
Menu

JoAnna Seiter

  • New Home
  • About
  • Contact
  • Tips & Tutorials
  • Portfolio
  • Digital Downloads
  • SHOP
  • featured in
  • INSTAGRAM
1-JoAnna-Seiter_Square.jpg

JoAnna’s Tips & Tutorials

Hi, I’m JoAnna, thanks for stopping by! I love creating textile and surface pattern designs, sewing, and painting. I’m always learning new things and want to share some of that info with you. I hope to bring you a helpful tutorial or a quick little tip each week.


Latest Posts:

Featured
Cameo 4 Foil Quill Alternative
Jun 7, 2022
Cameo 4 Foil Quill Alternative
Jun 7, 2022
Jun 7, 2022
Silhouette Cameo 4 Fine Tip Foil Quill Adapter
May 31, 2022
Silhouette Cameo 4 Fine Tip Foil Quill Adapter
May 31, 2022
May 31, 2022
Shrink Plastic Pins with the Cricut Maker
Mar 15, 2022
Shrink Plastic Pins with the Cricut Maker
Mar 15, 2022
Mar 15, 2022
Making Pins using Black Shrink Plastic and the Foil Quill
Mar 8, 2022
Making Pins using Black Shrink Plastic and the Foil Quill
Mar 8, 2022
Mar 8, 2022
Another Style of Watercolor Clipart in Procreate
Mar 1, 2022
Another Style of Watercolor Clipart in Procreate
Mar 1, 2022
Mar 1, 2022
Creating Watercolor Style Clip Art in Procreate to Use With Your Cricut or Silhouette Machine
Feb 22, 2022
Creating Watercolor Style Clip Art in Procreate to Use With Your Cricut or Silhouette Machine
Feb 22, 2022
Feb 22, 2022
Creating Gouache Style Clip Art in Procreate to Use With Your Cricut or Silhouette Machine
Feb 15, 2022
Creating Gouache Style Clip Art in Procreate to Use With Your Cricut or Silhouette Machine
Feb 15, 2022
Feb 15, 2022
Creating a Single Line SVG File in the Adobe Illustrator App Using Vectorize
Feb 8, 2022
Creating a Single Line SVG File in the Adobe Illustrator App Using Vectorize
Feb 8, 2022
Feb 8, 2022
Creating Your Own Single Line SVG File - Part Three
Feb 1, 2022
Creating Your Own Single Line SVG File - Part Three
Feb 1, 2022
Feb 1, 2022
Creating Your Own Single Line SVG Files - Part Two
Jan 25, 2022
Creating Your Own Single Line SVG Files - Part Two
Jan 25, 2022
Jan 25, 2022
Creating Your Own Single Line SVG Files - Part One
Jan 18, 2022
Creating Your Own Single Line SVG Files - Part One
Jan 18, 2022
Jan 18, 2022
Low Poly Heart Box
Jan 11, 2022
Low Poly Heart Box
Jan 11, 2022
Jan 11, 2022
Planner Stickers with the WRMK Foil Quill
Jan 4, 2022
Planner Stickers with the WRMK Foil Quill
Jan 4, 2022
Jan 4, 2022
3D Cardstock Snowflakes
Dec 28, 2021
3D Cardstock Snowflakes
Dec 28, 2021
Dec 28, 2021
Portrait 3 Print and Cut Gift Labels
Dec 21, 2021
Portrait 3 Print and Cut Gift Labels
Dec 21, 2021
Dec 21, 2021
DIY Gift Card Envelopes
Dec 14, 2021
DIY Gift Card Envelopes
Dec 14, 2021
Dec 14, 2021
Blade Replacement Alternatives for Portrait 3
Dec 7, 2021
Blade Replacement Alternatives for Portrait 3
Dec 7, 2021
Dec 7, 2021
12 Gift Ideas for Someone Who Owns a Cricut or Silhouette Machine
Nov 30, 2021
12 Gift Ideas for Someone Who Owns a Cricut or Silhouette Machine
Nov 30, 2021
Nov 30, 2021
Foiling on Acrylic with Cricut and WRMK Foil Quill
Nov 23, 2021
Foiling on Acrylic with Cricut and WRMK Foil Quill
Nov 23, 2021
Nov 23, 2021
How to Set Up Your Template on Your Cutting Mat for Silhouette Users
Nov 16, 2021
How to Set Up Your Template on Your Cutting Mat for Silhouette Users
Nov 16, 2021
Nov 16, 2021
Etching on Acrylic with the Silhouette Portrait 3
Nov 9, 2021
Etching on Acrylic with the Silhouette Portrait 3
Nov 9, 2021
Nov 9, 2021
Foil Quill on Acrylic with the Portrait 3
Nov 2, 2021
Foil Quill on Acrylic with the Portrait 3
Nov 2, 2021
Nov 2, 2021
Scoring with the Portrait 3 Using the Cricut Scoring Stylus
Oct 26, 2021
Scoring with the Portrait 3 Using the Cricut Scoring Stylus
Oct 26, 2021
Oct 26, 2021
Silhouette Portrait 3 Scoring with the Bevel Quill
Oct 19, 2021
Silhouette Portrait 3 Scoring with the Bevel Quill
Oct 19, 2021
Oct 19, 2021
Tips for Using the WRMK Fine Tip Foil Quill with the Silhouette Portrait 3
Oct 12, 2021
Tips for Using the WRMK Fine Tip Foil Quill with the Silhouette Portrait 3
Oct 12, 2021
Oct 12, 2021
Using the Trace Tool in Silhouette Studio
Oct 5, 2021
Using the Trace Tool in Silhouette Studio
Oct 5, 2021
Oct 5, 2021
Using the Silhouette Portrait 3 Pixscan Mat to Cut Stickers
Sep 28, 2021
Using the Silhouette Portrait 3 Pixscan Mat to Cut Stickers
Sep 28, 2021
Sep 28, 2021
Cricut Snap Mat Feature to Cut Stickers
Sep 21, 2021
Cricut Snap Mat Feature to Cut Stickers
Sep 21, 2021
Sep 21, 2021
Cutting Full Sticker Sheets with Your Cricut - Part 3 - Final Cutting
Sep 14, 2021
Cutting Full Sticker Sheets with Your Cricut - Part 3 - Final Cutting
Sep 14, 2021
Sep 14, 2021
Cutting Full Sticker Sheets with Your Cricut - Part 2 - Test Printing
Sep 7, 2021
Cutting Full Sticker Sheets with Your Cricut - Part 2 - Test Printing
Sep 7, 2021
Sep 7, 2021

Digital Downloads

Featured
Floral Easter Egg Single Line SVG Files
$2.00
Carnation Flower Single Line SVG File, Botanical Floral Clip Art, Instant Digital Download
$3.00
Daffodils_Main Page-01.jpg
Daffodil Flower Single Line SVG Files
$3.00
Lilies_Main Page-01.jpg
Lily Single Line SVG Files
$2.00
3D Low Poly Heart Box SVG File
$2.00
Month, Day, Numbers Single Line SVG files
$2.00
Celestial_Main Page-01.jpg
Celestial Theme Single Line SVG Files
$5.00
Good Luck Charm Single Line SVG Files
$5.00
Floral Skull Single Line SVG Files
$3.00
Snowflake Single Line SVG Clip Art Files
$5.00
Screen Shot 2021-02-15 at 2.20.44 PM.png

Creating an Offset for Stickers in Adobe Illustrator - Method 1

February 16, 2021 in Cricut, Tutorial

Hi Everyone! This week I want to share one of the methods I use to create offsets for my stickers. This is just one of the methods you can use. I like it because you can get a clean and simple cut line. I’ll be sharing some other methods in future posts.

For this method I will be using the Blob Brush tool in Adobe Illustrator.

Let’s get started!

Supplies: (Links below may be affiliate links)

  • Sticker artwork (I’m using artwork I created in Adobe Fresco, you can use your own artwork)

  • Adobe Illustrator CC

  • Inkjet printer

  • Sticker Paper (I’m using this waterproof vinyl paper)

  • Cricut Maker or other Cricut machine

  • Light Grip Mat (the blue one)

  • Fine Point Blade

My artwork is a PNG file. I created it in Adobe Fresco and then exported it as a PNG so there is no background. I’m placing my artwork in Adobe Illustrator.

After I place my artwork, I create a new layer below my artwork layer. This is where we will be making the offset.

Lock the layer with the artwork so you don’t accidentally select it.

Screen Shot 2021-02-15 at 10.39.26 AM.png

I’m picking a bright contrasting color so I can easily see my offset that I’m creating.

Select the Blob Brush tool (Shift + B)

I start “painting” around the edges of my artwork. I’m just going around the outer edge and making a small border around my artwork.

Screen Shot 2021-02-15 at 10.42.59 AM.png

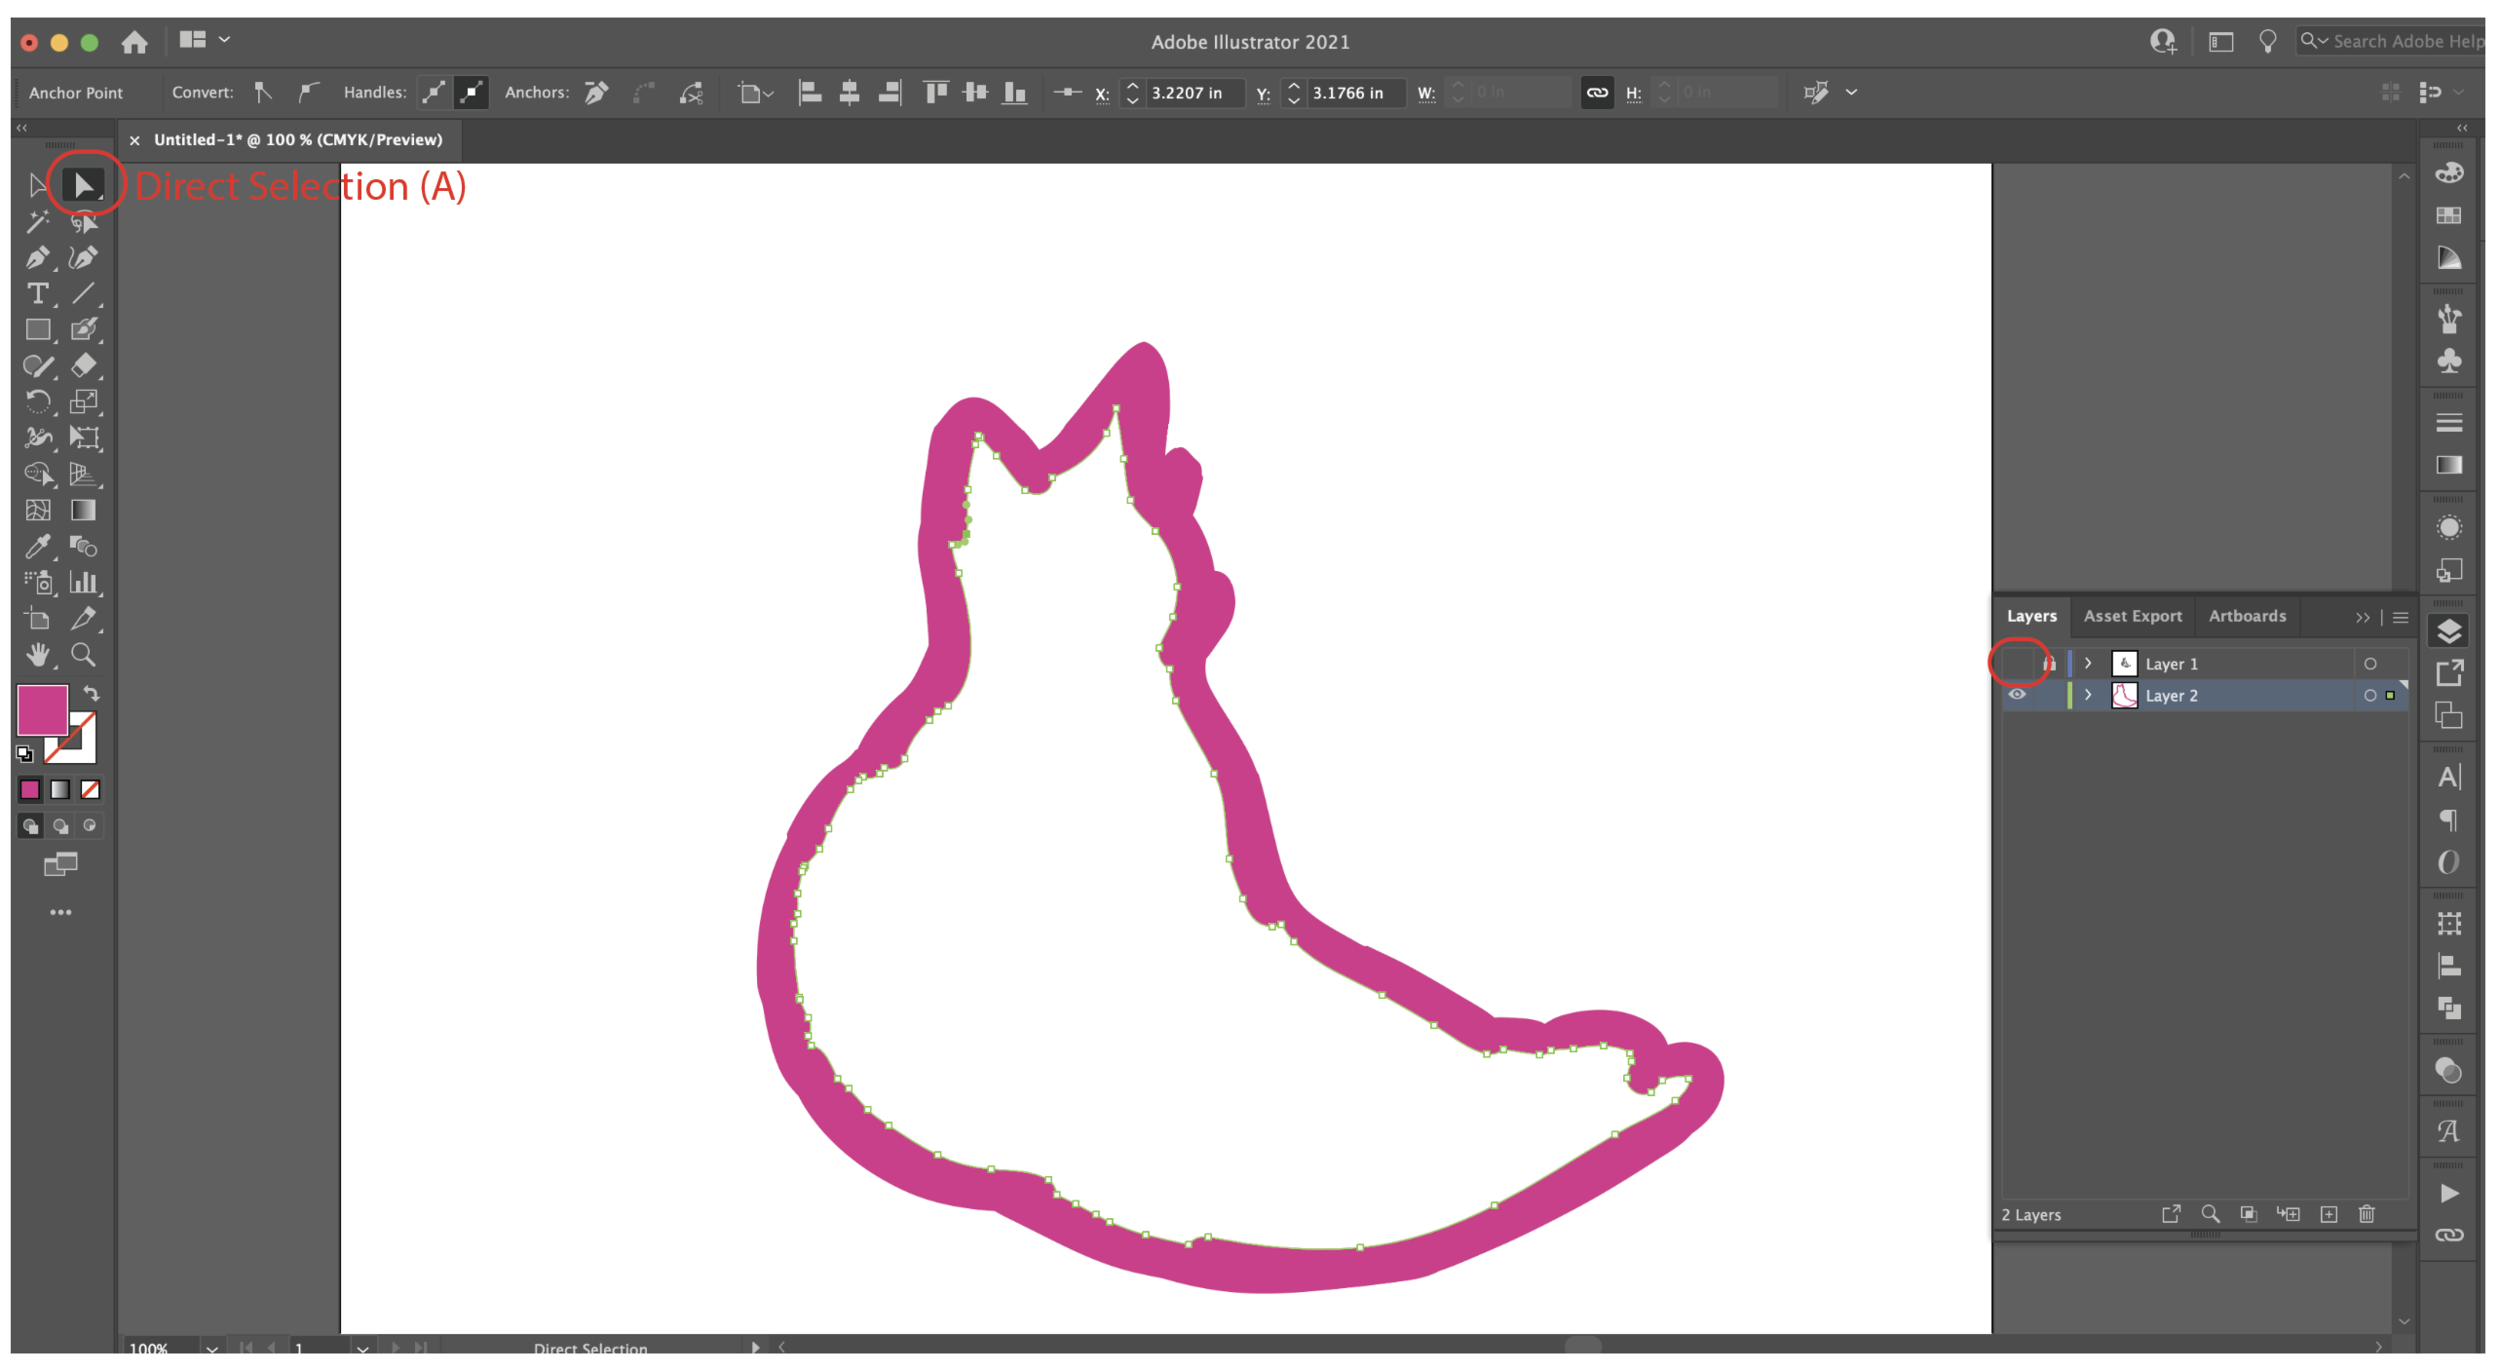
Once you are finished going around the edge, I turn off my artwork layer (click the eyeball in the layers panel). Now I’m only seeing the outline that I just painted.

Using my direct selection tool (white arrow, keyboard short cut “A”) I’m going to select the just the inside path and press DELETE.

Screen Shot 2021-02-15 at 10.46.14 AM.png

Now you have a solid filled shape. If I want to refine my shape even more, I will go around the edges with the eraser tool (Shift + E) and the Smooth Tool.

Screen Shot 2021-02-13 at 2.33.29 PM.png

I’m going to add a few more stickers, resize, and layout my artwork on my page.

Screen Shot 2021-02-13 at 5.17.36 PM.png

Then add crop marks to the corners.

Screen Shot 2021-02-15 at 10.52.09 AM.png

Next, I’m printing a test page directly from Illustrator to check the scale of my stickers. I’m keeping the offset showing on my test print so I can determine how far off my machine alignment is since I’m not using the Cricut Print and Cut function.

Once I’m happy with the scale of my stickers, I’m going to place my test print onto my blue cutting mat in the upper left corner. (My white border is the area that Design Space will not allow you to place your artwork beyond.)

Screen Shot 2021-02-15 at 3.15.54 PM.png

I’m going to save my artwork file with the stickers and cut files as an AI (Illustrator file). Then I’m going to delete the sticker artwork, leaving only the cut lines and crop marks, and save this as and SVG file that we will upload into Cricut Design Space.

Screen Shot 2021-02-15 at 11.02.10 AM.png

Upload the SVG file to Design Space and press INSERT IMAGES.

Screen Shot 2021-02-15 at 11.04.11 AM.png

Select the very top layer and click ATTACH so all the cut lines and crop marks stay together.

Then press MAKE IT.

Screen Shot 2021-02-15 at 11.09.27 AM.png

Make sure your top left crop mark is as far to the top left as Design Space will allow and press CONTINUE.

Screen Shot 2021-02-15 at 11.38.08 AM.png

I am using the Printable Sticker Paper (white) material setting. I load my mat into the machine and press GO.

Screen Shot 2021-02-15 at 7.36.25 PM.png

My machine alignment looks pretty good. I’m not going to get too fussy since it will be a white border.

Screen Shot 2021-02-15 at 2.16.22 PM.png

Since my alignment is good, I’m going to print my designs from Illustrator on the actual sticker paper, without the cut lines showing.

Load my mat with the sticker paper this time. Select the Printable Sticker Paper material setting again. Load my mat and press GO.

Once the machine is done cutting, DO NOT REMOVE the mat. Check to make sure it cut all the way through the material. It took about 4 passes to get all the way through the sticker paper, I might try another material setting next time.

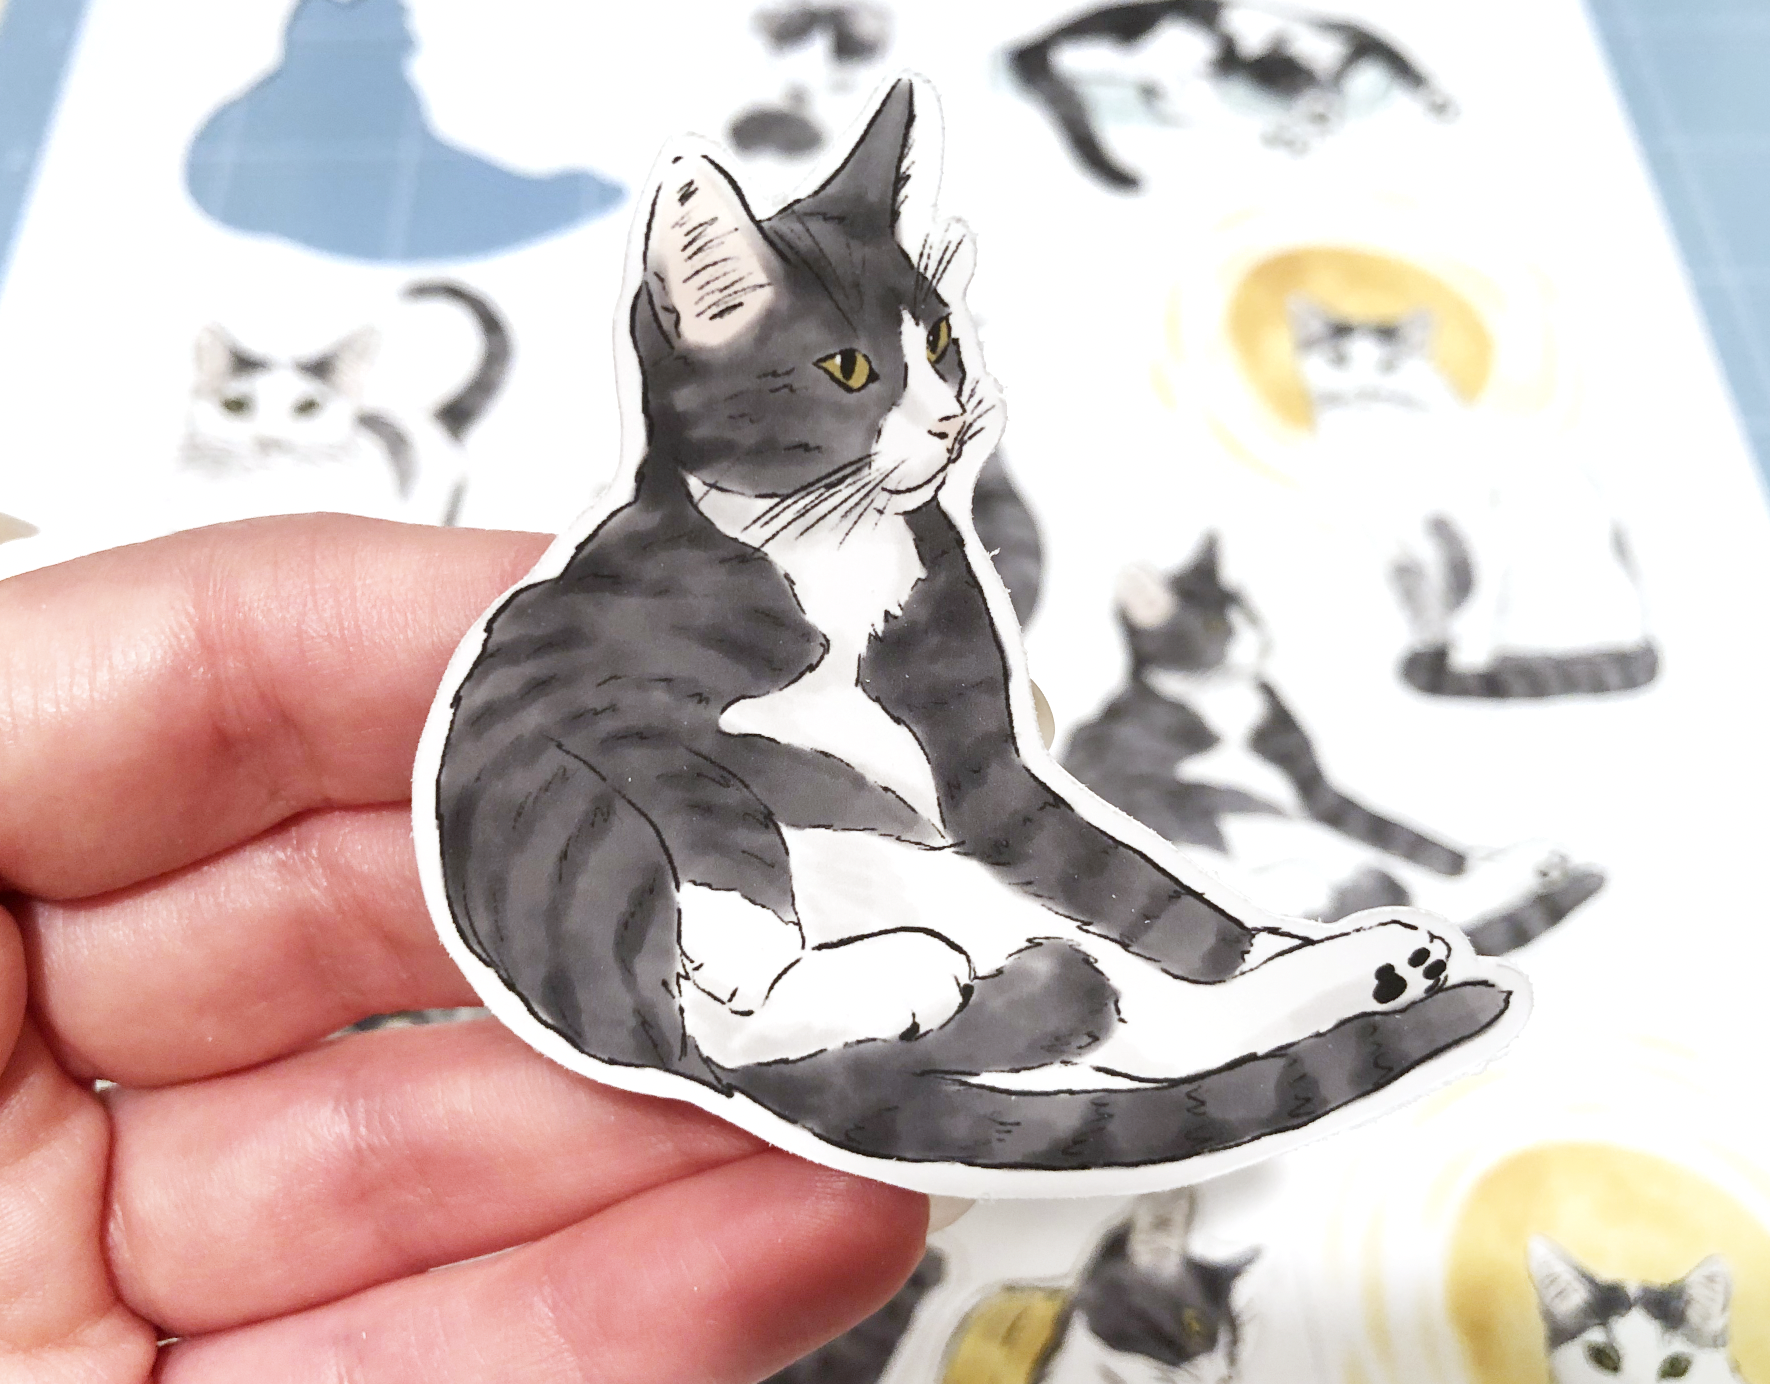
Now we have some cute kitty stickers! These are vinyl and waterproof so you can stick them on a water bottle, phone case, laptop, notebook, etc.

Screen Shot 2021-02-15 at 3.12.48 PM.png
Tags: Cricut Maker, DIY stickers, sticker offset, white border around stickers, sticker outline, sticker cut line, vinyl stickers, white sticker border, how to, DIY custom vinyl stickers, custom vinyl stickers
← Creating an Offset for Stickers in Adobe Illustrator - Method 2Kiss Cut Stickers on My Cricut Maker →
Back to Top

Copyright 2023, JoAnna Seiter. Images may not be used without approval. Terms & Conditions